• About the Author
  • Recipe Index
  • Contact Me
  • The Kitchen Crew
  • The Legal Necessities

More Savory, Less Sweet

Adventures in Food - Taste, Explore, Inspire and Share

Greek Style Salad and Chicken with Herbs

06/20/2014 by Laura 1 Comment

Here in Seattle,  I can visit a different neighborhood Farmers Market everyday of the week from early June through late September.  I visited the Lake City Farmers Market yesterday afternoon.  It was my first visit to this particular market, and my first “summer” market shop.  Needless to say, I got a little excited and a bit carried away.  I found many late spring treasures: last of the season asparagus,  fava beans, English shelling peas, green garlic,  garlic ramps, farm fresh eggs and farmstead feta cheese.  There were also some early summer things from the warmer, Eastern part of the state:  cucumbers, peppers and even a few tomatoes.  I had no immediate plans for anything I bought.  I just knew it would all be wonderful.

Quickly surveying what was available from my garden, the chicken breasts I thawed earlier in the day, and my haul from the market, I decided on a Greek Salad and grilled chicken for dinner.

Greek Salad and chicken

Dave was at rehearsal and not around to help me with photos, so I had not really planned on posting this meal.   I took a few shots along the way that turned out fairly well, and since the meal was really delicious, I decided to share it after all.

Like I mentioned earlier, I had originally planned to throw the chicken on the grill for a few minutes.  Once the chicken breasts were on the plate and liberally seasoned with olive oil, chopped oregano, lemon zest and salt and pepper; they just seemed to say “roll me up and sauté me”!  Ok then, that’s what I did and I will definitely do it again.  Next time, I will hold back a little feta from the salad and include that in the center as well as the herbs.

greek style chicken

dog park greek salad 009.2

Roll the chicken from the longer edge.  Tie with kitchen twine or secure with toothpicks.  Heat a sauté pan over medium heat.  Add a little olive oil to the pan.  Sauté the chicken breasts on all sides, until done…about 10 minutes.  Deglaze the pan with a squeeze of lemon juice and a little white wine.  Slice the chicken into rounds and serve with the pan drippings and the Greek Salad.

greek style chicken2


Laura’s Greek Style Salad – adjust the ingredients and proportions to your  personal taste

Cucumber, peeled, quartered and sliced

Red bell pepper, chopped into bite size pieces

Purple onion, quartered and then thinly sliced

Pitted kalamata olives

Feta cheese, cut into cubes

Cherry tomatoes, halved

2 Tablespoons fresh oregano, coarsely chopped

Fresh cracked pepper and freshly ground salt

Juice of one lemon

Good quality, fresh, peppery olive oil

Chop all ingredients and place in a bowl.  Gently mix with your hands.  Add the lemon juice and enough olive oil to coat the vegetables.  (Olive oil to lemon juice ration is typically 3 to 1.)  Adjust the seasoning.  Chill until ready to serve.  I plated the salad on butter lettuce leaves.

I harvested our first of the season tomatoes this week!  Having a ripe tomato this early is a big accomplishment in Seattle!  I took a chance and planted earlier than usual this year.  Luckily, the weather has supported that decision with mild temperatures and alternate days of rain and sun.

first tom 001.2


Filed Under: Poultry, Quick - Week Night, Salads, Vegetables, Vegetarian Tagged With: chicken, cucumber, feta, garlic, greek, kalamata olive, olive oil, oregano

Memorial Day Fiesta – Chile Relleno

05/27/2014 by Laura Leave a Comment

While at the market gathering ingredients for tamales, I noticed beautiful, fresh poblano chile peppers.  Right then I decided I would serve chile relleno alongside the tamales.  When I can, I use fresh Hatch green chiles from New Mexico.  When Hatch chiles are out of season, I use poblanos.  Either way, you want to use the freshest chiles you can find.

tamales rellenos 264.1

For the Chile Relleno

8-10 fresh Hatch or Poblano Chiles

1 pound Monterey jack or pepper jack cheese

1 cup flour

salt and pepper

4 eggs, separated

oil for frying

Begin by roasting the chiles.  Roast them on a very hot grill, turning about every 5 minutes, until all sides are charred.  Be sure and make a small slit in each chile to allow the steam to escape, prior to roasting.

tamales rellenos 125.1

It is important to wear gloves when handling the chiles.  Once the chiles are roasted, place them in a plastic bag to “steam” about 10 minutes.  Remove the chiles from the bag and gently peel away the charred skin.  Cut a slit in one side of the chile.  Pull out the seeds as gently as possible.

Cut the cheese into rectangles that will fit into the chile.  Place a piece of cheese in each chile.  Close the open edge with a toothpick.

tamales rellenos 204.1

Separate the four eggs.  Beat the whites to form stiff peaks.  Break up the yolks with a fork.  Gently fold the yokes into the whites with a spatula.  Place the flour on a plate or bowl that the chile will fit into.  Season the flour with salt and pepper.  Heat  about 1″ of oil in heavy skillet, over medium high heat.

Dredge the stuffed chile in the flour.

tamales rellenos 245.1

Dip the chile in the egg mixture.  Hold the chile by the stem and let the excess egg mixture drip off.

tamales rellenos 248.1

Place the chile into the hot oil.  Brown on all sides.

tamales rellenos 260.1

Place the fried chiles on a rack over a pan.  When ready to serve, heat them in a 350′ oven for about 10 minutes.  Serve with red enchilada style sauce  Be sure to let your guests know to watch out for the toothpick!


Filed Under: Mexican, Vegetables, Vegetarian

Spring has sprung….the crops are in!

05/19/2014 by Laura 2 Comments

I cannot believe it’s been over a month since the last post!  Things got a little busy around here… plants needed to be planted, walls needed to be painted, an injured dog needed tending (Jasper dislocated his hip – he is fine now), and…. there was asparagus.  I have written about this treasure of Spring a few times, but it is one of the biggest reasons I have not been posting any recipes.  We (mostly me) have been eating it constantly!  There was halibut with asparagus, salmon with asparagus, lamb chops with asparagus, steak with asparagus, poached eggs with asparagus, asparagus risotto and asparagus quiche.   Would you really have come back if I posted 20 meals in a row featuring asparagus?  Well, some of you would, but not all!

garden 080

And….there was the garden.  While soil prep and weeding do not create many photo ops or stories to tell, they are necessary steps for success.  Since our weather has been very mild and the sun and rain are working in concert, I took a chance and planted things a little early.   The zucchini and the basil may be premature, but they are easily replaced if the weather should turn!  Strawberries, raspberries and blueberries all look like we will have bumper crops this year!

garden 047

I found good size tomato plant starts in all my favorite varieties.  Green Zebra, Black Prince, Juan Flamme, San Marzano, Sungold, and Early Girl.  I also planted peppers, cucumbers and summer squash.   There are beans, and peas and fennel, Brussels sprouts, garlic, basil, bok choy, radishes and lettuce.   I cannot wait to create  meals from the garden.

garden 027

garden 040

garden 041

Our vegetable garden nourishes our bodies…..while our back yard garden nourishes our soul.  I am so pleased with the flowers this year.  The consistent and proportional rain and sun have created a beautiful landscape.  I hope you all get out there and plant something!   As Audrey Hepburn once said:

“To plant a garden is to believe in tomorrow.”

garden 011

garden 016

garden 019

Filed Under: Gardening, Vegetables

Spring has Sprung! Lamb Chops and Roasted Asparagus

03/25/2014 by Laura Leave a Comment

You know we’ve passed through that dark, seemingly endless tunnel of winter,  into the lighter  days of spring when those lovely green spikes begin “stalking” you!  Yes, I am talking about ASPARAGUS!  There are no in-betweeners when it comes to asparagus – you either hate it (Dave) or cannot get enough of it (me).   And so it begins, lamb chops and asparagus, halibut and asparagus, asparagus and shrimp stir fry, asparagus quiche,…. and Dave repeatedly asking “asparagus AGAIN”?  Ah, the cycle of life.

Laura’s Lemony Galicky Lamb Chops with Roasted Asparagus

lamb chops 010.2

2-3 chops per person

For the marinade

Juice of 2 large lemons

finely chopped lemon peel, from one lemon, for garnish

1/3 cup peppery olive oil

1/4 cup of chopped fresh oregano, plus a little extra for garnish

4-6 cloves of garlic

Freshly ground salt and pepper

Mix all ingredients well.  Pour over chops, cover and marinate at least two hours, or overnight.  (I usually use a zip lock bag….but that is not very photogenic.)

lamb chops 001.2

While the grill is heating, prepare the asparagus.  Trim the ends and peel the lower tougher part, if needed.  Place in a roasting pan, drizzle with olive oil, season with salt and pepper.   I either place the pan on the grill, next to the chops or cook in my small toaster oven.  Either way – it will take about the same time as the chops to cook – 10 minutes.   Season asparagus and chops just prior to serving and garnish with the finely minced lemon peel and oregano.

lamb chops 007

We served our meal with a quick couscous side dish.  I also like quinoa or Greek style roasted potatoes with this recipe.  Enjoy!

Filed Under: Lamb, Quick - Week Night, Vegetables Tagged With: asparagus, garlic, lamb chops, lemon, marinade, oregano

Panang Curry Salmon with Asian Style Veggies

01/16/2014 by Laura 1 Comment

I first had Panang Curry Salmon in a tiny Thai restaurant on the outskirts of Chinatown in WaDC.  It immediately became one of my favorite dishes. Quick, full of flavor and even on the healthy side!  Mae Ploy is my favorite brand for curry pastes and coconut milk.  It is readily found in larger Asian markets.    The Bok Choy, Shitake Mushrooms, Garlic, Ginger and Bell Pepper stir fry were a perfect accompaniment!

Panang Curry Salmon with Stir Fry Veggies

 For the Panang Curry Salmon

1 Salmon filet – 1 1/2 – 2 pounds, pin bones carefully removed

Season salmon with salt and pepper.  Place on a large piece of foil that has been sprayed with oil.  Gril salmon on hot grill, until medium-rare, about 12 minutes. (As you can see, we grill all year, in the rain, sleet, snow and dark of night!  You could also choose to broil the salmon.)

Grilled Salmon

For the Panang Curry Sauce

Heat 2 tablespoons of high-heat oil over medium heat in a sauté pan.  Add 2-4 Tablespoons of Panang Curry paste.  Saute for two – three minutes.  Add 1/4 – 1/3 cup of sake (or dry white wine).  Simmer about 1 minute.

Panang Curry Salmon

Add 1/2 can of Mae Ploy Coconut milk.  Stir in 2-3 Tablespoons of Fish Sauce, depending on your taste. (3 Crabs is my favorite brand, as I have mentioned in previous posts.)

Panang Curry Salmon

Stir thoroughly and return to a simmer.  Reduce heat to very low.  Keep warm while you prepare the veggies and grill the salmon.

For the Vegetables

3-4 heads of baby bok choy, sliced

1 yellow bell pepper, chopped

1 red Fresno chili pepper, minced

4-5 cloves of garlic, minced

1 small, sweet onion, diced

1/2 pound shitake mushrooms, sliced

High heat oil for sautéing

Splash of sake or dry white wine

Asian Stir Fry Veggies

Heat 2-3 tablespoons of oil in a large sauté pan that has a lid.  Sauté the onion and garlic about 4 minutes.  Add the chili, bell pepper and mushrooms.  Cook 2-3 more minutes.  Add the sliced bok choy and a generous splash of sake or white wine.  Reduce heat and cover.  Let vegetables steam while you grill the salmon.  Season with fish sauce or soy sauce.

Asian Veggie Stir Fry

To serve:  Place a generous amount of veggies in a pasta bowl or on a plate.  Top with a serving of salmon.  Spoon the sauce over the salmon.  Garnish with slivered basil.

Filed Under: Fish and Seafood, Vegetables Tagged With: 3 Crabs Fish Sauce, bok choy, coconut milk, curry, paste, salmon, shitake mushroom

Roasted Butternut Squash Soup with Asiago Cheese Crouton

10/13/2013 by Laura Leave a Comment


If you didn’t know fall  was here by chilly evenings then you certainly would know by the markets being filled with fabulous, and sometime freakish,  squash.  There are few things as warming and comforting as this creamy squash soup.  There is a little heat from the cayenne and red pepper flakes, and the sweet potato gives it body.  Roasting the squash, onion, apple, and potato first, maximizes the sweetness of the vegetables.  You can use real cream, fat-free cream, or a non-dairy cream to make this vegan.

4 to 6 cups peeled butternut squash, cut into 1-inch chunks

1 large, sweet onion, sliced

1 apple, peeled, cored and cut into chunks

1 large sweet potato, peeled and chopped

butt squash soup carrot cake 002.2

Place all in a roasting pan.  Drizzle with olive oil, and season with salt and pepper.  Roast in 350′ oven about 45 minutes or until soft.  While the squash roasts – prepare the rest of the ingredients.

2 Tablespoons Olive Oil

1 cup finely diced celery

1 cup peeled and finely diced carrot

1 large leek, washed, chopped – not the tough green part

butt squash soup carrot cake 004.2

1 teaspoon marjoram

1 teaspoon thyme

1 teaspoon cumin

1/2 teaspoon cinnamon

1/8 teaspoon cayenne pepper

1/2 teaspoon crushed red pepper flakes

1 teaspoon salt

1/2 teaspoon fresh ground black pepper

1 – 2 cartons, 32 ounces vegetable broth

2 cups half and half, I used “fat free”

Warm the olive oil in a large soup pot.  Sauté the leeks, carrot and celery, until soft.  Add the roasted squash and other vegetables to the pot.  Turn heat to low, place lid on pot and “sweat” the vegetables for about 5 minutes.  Add the spices and seasonings and 1 carton of the  vegetable broth.  Reduce heat to low and simmer about an hour.

Puree the soup, either with an immersion blender, or puree in batches in a regular blender.  Adjust the thickness of the soup by adding additional vegetable broth if needed.  Adjust the seasonings to taste.   Add the cream,  warm on very low heat.

butt squash soup carrot cake 008.2

 For the crouton

I found some fabulous Rosemary and Olive Oil Asiago cheese made by Sartori.  The flavors blend so well with this soup, I decided to make a little crouton for a garnish.

Toast a slice of baguette for each serving of soup.  Top with a few thin slices of Asiago cheese.   Place the crouton on the soup and garnish with dried rosemary.

butt squash soup carrot cake 028.2


Filed Under: Soup, Vegetables, Vegetarian Tagged With: butternut squash, carrot, sweet potato

Heirloom Tomato, Basil and Buratta Salad

09/07/2013 by Laura 3 Comments

I hesitated posting this, as it is so simple. Then I thought about February in Seattle.  I will want to look at these photos in a few months to remind myself there is hope….the rain will stop, the sun will shine,  the ground will thaw, we will plant a garden, and we will have gorgeous heirloom tomatoes once again.

passport 015

We are to have a few more record-breaking days in the low to mid-eighties this week.  The best summer I can remember in Seattle.  Knowing the tomatoes will soon stop, I decided to treat myself one (hopefully not, but probably so) last time to an heirloom tomato, basil and burrata salad.  It was the perfect chance.  Dave was away at a gig,  and I did not need to prepare a full meal.  Dave does not like burrata nor would he ever consider a tomato salad a meal.  He would probably fall over dead to know we paid $30 for this at Boulevard in San Francisco last summer!  Anyway, spring for the buratta and heirloom tomatoes(if you don’t have them in your garden)….treat yourself, it is worth it!

passport 014

Buratta, Heirloom Tomato and Basil Salad

Heirloom Tomatoes

Basil

Buratta

Fruity Olive Oil

Balsamic Vinegar or Balsamic Glaze

Fresh Ground Salt and Pepper

I arranged my tomatoes and cheese on a pile of wild arugula, which is not visible.  (Also something I love that Dave does not care for!) Garnish with fresh basil, cracked pepper and salt and a drizzle of EVOO and balsamic. ENJOY!

passport 019

Filed Under: Appetizers, Gardening, Quick - Week Night, Salads, Vegetables, Vegetarian Tagged With: arugula, balsamic vinegar, basil, EVOO, heirloom tomatoes

Summer Harvest: Peach and Roasted Beet Salad, Garden Bruschetta and Half Sour Pickles

08/10/2013 by Laura Leave a Comment

This week, I tried to keep pace with everything the garden was throwing at us!  There were pickles to be made, raspberries to be preserved, green beans, beets, peaches that had to be eaten.  What can I say, it’s a tough job and somebody’s got to do it!

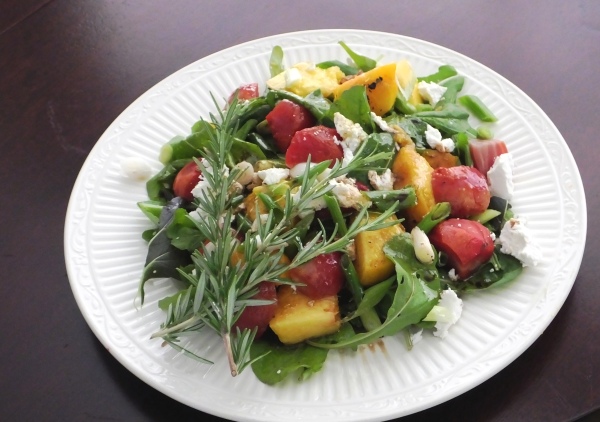
First up is a wonderful, refreshing Peach and Roasted Beet Salad.  Yup – you read that right!

8.10.13 030.1

The recipe is inspired by one I found on our local co-ops website, PCC Natural Markets.

Ingredients

  • 10 to 12 small beets: red, yellow and Chiogga
  • 3 green onions, sliced in 1/4′ slices on the diagonal
  • 2 yellow peaches or nectarines, peeled, seeded, grilled, cooled and sliced into chunks
  • 5 ounces baby arugula
  • 2 ounces crumbled goat cheese

For the Dressing

  • 1/2 cup fresh orange juice
  • 1/4 cup balsamic vinegar
  • 1/4 teaspoon unrefined sea salt
  • Fresh ground black pepper
  • 2 teaspoons fresh thyme
  • 1/2 cup olive oil

Scrub the beets.  Place in a roasting pan, toss them in a generous dash of olive oil.  Roast them at 350′ for about 35 minutes or until you can easily insert a knife tip into the largest one.  Put the beets in a zip lock bag and place them in the refrigerator.  Once cool, the skins will slide right off.

I grilled the peaches for a few minutes to intensify the flavor.  I chilled them before assembling the salad.

Combine the dressing ingredients in a jar.  Shake well, and refrigerate.

To plate the salad:  Arrange the arugula, beets, peaches on a serving plate.  Add the diced onions.  Garnish with the crumbled goat cheese  a sprig of rosemary.  Drizzle with the dressing.

Sautéed Green Beans, Laura’s Way!

Green beans have been a part of summer my entire life.  My grandpa grew them, my mom grew them and I continue to grow them today.  I remember one summer driving with my mom, cross country for one of their West Coast to East Coast moves.   Every dinner, for two weeks, was served with green beans!  I’ll never forget the look on the server’s face at the restaurant in Springfield, MO, when I let out a big “OH NO” after asking her what the vegetable of the day was!   We explained our situation, and we all had a good laugh!

8.10.13 015.1

Sauté a diced, sweet onion in a good amount of olive oil in a large sauté pan, that has a lid.  Add a desired amount of diced bacon (or not) and cook most of the way done.  Add the beans.  I had a combination of wax beans and Royal Burgundy purple beans (they turn green when they cook).  Saute about 5 minutes.  Add about 3/4 cup of DRY VERMOUTH.  Yup – an old restaurant trick. Bring to a slow simmer, cover, and steam about 20 minutes.  Season with salt and pepper and fresh dill.

Garden Fresh Bruschetta

One of our favorite summertime treats is straight from the garden bruschetta. Diced tomatoes, finely chopped garlic and fresh sliced basil, all tossed with the best olive oil and placed on a toasted slice of baguette!  YUMM!  We had some fresh mozzarella on hand, so I added a pinch to each, glorious serving.

8.10.13 062.1

8.10.13 051.1

Half Sour Pickles

I absolutely LOVE the fresh, bright green pickles that are served “all you can eat” style at any good deli!  I had no idea how simple they were to make!  Thanks to a very productive pickling cucumber plant, I now have my own  jar of half sours, bubbling away in my refrigerator.  I found the recipe in The Victory Garden cookbook.

pickles 008.1

Ingredients

12 pickling cucumbers, about 3-4″

4-5 cloves of garlic (original recipe calls for 1)

6-8 sprigs fresh dill

1/2 teaspoon dill seeds

1 tablespoon pickling spices

1/4 cup kosher salt

1/4 cup white vinegar

2 1/2 quarts of water

Thoroughly clean the cucumbers.  Halve or quarter them.  Wash the dill.  Peel and flatten the garlic.  Pack the cucumbers, dill, garlic, dill seed and pickling spice in a large glass jar, a pickle crock or a big glass bowl.  You will want to make sure the pickles will be covered with at least two inches of the water.

Bring the salt and the water to a boil.  Boil a full two minutes.  Pour the brine over the cukes.  Cover the jar with cheesecloth and secure it with a rubber band.  Let the pickles sit on your counter for 2-3 days.  The brine will get cloudy as fermentation occurs.  Once fermented to your taste, add the 1/4 of vinegar, cover and refrigerate.  They will keep forever under refrigeration, but believe me, they won’t last that long!

Raspberry Jam

I am not quite sure what motivated me to purchase a flat of raspberries at the farmers market, with everything else going on!  I do have raspberries in the garden, but only enough to add to my morning yogurt or smoothy each day.  You can see, they were hard to resist.  I love using raspberry jam in my thumbprint cookies at Christmas.  This year, they will be extra special 100% home made!

farmers market and risotto 013

Raspberry Jam*

I used 6 pints of fresh raspberries, about 4 cups of sugar, and the juice of one lemon.  I mashed the berries a bit with a potato masher.  I cooked the berries, sugar and lemon juice to a temperature of 220′, per my candy thermometer.  I processed the jam in 12 1/2 pint jars, for about 20 minutes.  It is absolutely delicious!

jam 015.1

*Note – there are 100’s of fabulous step by step instructions on the internet, for canning jams.  I was in a hurry and did not shoot the entire process, just the final product.  It is fun and easy and I encourage you to give it a try with your favorite fruit or berry!

Filed Under: Gardening, Salads, Vegetables, Vegetarian Tagged With: basil, beets, bruschetta, garlic, green beans, peaches, pickles

  • « Previous Page
  • 1
  • 2

Stay in touch!

Enter your email address to subscribe to More Savory Less Sweet, and receive notifications of new posts by email.

Look here for specific recipes.

Copyright © 2025 · Lifestyle Pro Child Theme for More Savory, Less Sweet on Genesis Framework · WordPress · Log in