• About the Author
  • Recipe Index
  • Contact Me
  • The Kitchen Crew
  • The Legal Necessities

More Savory, Less Sweet

Adventures in Food - Taste, Explore, Inspire and Share

First of Fall – Pork Chili Verde

09/21/2017 by Laura Leave a Comment

Wow!  Somebody flipped the “summer heat” switch to the “off” position!  I am grateful for cooler, more moderate temperatures, but it seems the change was a bit extreme!  There’s been at least a 20′ difference in temperatures from last week to this.  We knew rain was coming, so we scrambled to get the last of the garden clean-up / harvesting / fall planting done.  I ended up with a fair amount of peppers and tomatillos, which, along with the cool, rainy weekend, inspired me to make this dish.  We added a few more tomatillos, poblano peppers, garlic and onion from the farmers market, and we were set.

For the Pork Chili Verde (this makes a lot, we froze half)

for the tomatillo pepper slurry

8 poblano peppers

12-15 fresh tomatillos, husked and rinsed, stem removed

2 large white onions, peeled and quartered

8 cloves of garlic, peeled

8-10 assorted peppers – jalapeno, Fresno, Serrano, based on your taste and desired heat level!

Heat your oven to 500′.  Place all the peppers, tomatillos, quartered onions, and garlic on a sheet pan.  Roast the vegetables until they begin to brown and are softened.  This will take about 25 minutes.

Remove the stems and seeds from the roasted peppers.  Place all of the roasted veggies and any juice from the roasting pan,  in the large bowl of your food processor and pulse until smooth.

for the meat

4 pounds lean pork cut into 1″ cubes (I used boneless, thick cut pork loin chops)

flour, salt and pepper for dredging

neutral, high heat oil for browning

1 large, sweet onion, diced

1 can/bottle beer – an ale of your choice

2 cups fresh or frozen chopped Hatch green chili (I bought a ton directly from Hatch in August.  Canned chili ok, but not as flavorful.)

2-4 cups of chicken stock

1/2 bunch cilantro, chopped

2 tablespoons of cumin

Avocado slices, chopped cilantro, sliced green onion, cooked rice, charred tortillas, sour cream and shredded cheese for serving.

Heat a large Dutch oven over medium high heat.  Add 2-3 tablespoons of oil.  Place 1 cup of flour, one tablespoon of salt and one tablespoon of pepper in a zip lock bag.  Dredge the cubed pork, in small batches and add to the hot oil.  Do not crowd the pan.  Turn the pork to ensure all sides are browned evenly.  Repeat this process until all the meat is browned, adding additional oil as needed.

In the same pan, sauté the chopped onion until golden, scraping up all the bits from the bottom of the pan.  Deglaze the pan with the beer.  Let simmer 5 minutes.  Add the meat back to the pan, then the pureed veggies, and the chopped green chili, cilantro and cumin.  If too thick, add a cup or two of the chicken stock.  Stir well, cover and simmer over low heat, about 6 hours.  Stir frequently and adjust the salt as needed, also adding additional stock if needed.

I also made a batch of black beans to serve along side, and a delicious, but non instagram worthy,  apple pie for dessert.  Ahh fall!  I wish you could have all smelled the kitchen.

To plate, place a scoop of rice on a plate or bowl.  Add a serving of stew.  Garnish with a dollop of sour cream, cilantro and green onions.  I served black beans and charred tortillas along side.

I really hope you’ll give this recipe a try.  It’s one of our favorites.  Great left over and freezes well too.

Have a wonderful evening, and thanks for stopping by.

Laura

Filed Under: Gardening, Mexican, One Pot Meal, Pork, Vegetables Tagged With: green chili, poblano, pork, stew, tomatillos

The Green Bean Summer

09/04/2017 by Laura Leave a Comment

I planted my green beans a little later then normal this year.  Typically that would have been a problem here in Seattle.  Since we have had ridiculously hot weather, their late start  has had no impact on the crop and harvest.  As I was cooking up this batch of beans, I became very melancholy.  No other food has been such a constant in my life.  I grow the Royal Burgundy variety of beans, because that is what my grandparents grew.  I think Granddad started growing them when we were kids, to thrill us by their novel change in color when they are cooked.  Growing up, green beans were the only vegetable my brother would eat.  When they were out of season, Mom resorted to canned (yuck) green beans.  Canned or fresh,  my Mom and Grandma would add bacon, and simmer them on the stove FOR HOURS, as was the norm back then.  There was never a doubt as to what the Thanksgiving, Christmas, Easter, or Sunday dinner vegetable would be.   Once my brother had kids, the tradition continued in his own family.  I think there was a streak of about 10 years, when little smokies had to be added to the pot, per my youngest nephews instruction!  My nephews, now adults, specifically ask if we can have something besides green beans when they are invited to dinner at Grandma’s or Auntie’s house!

My first summer after college, my parents moved from Idaho Falls, ID to Washington DC.  I needed a break and an adventure, and my Mom needed help driving across the country, so I too packed up for the move.  Prior to hitting the road, we spent about a week at my Grandfather’s house.  Since it was summer, the green beans were plentiful.  I think we had them three or four times, all picked fresh and simmered for hours.  On the road heading east toward  I-70, our first night was in a little town somewhere in Montana.  We had dinner in a little diner, close to our motel.  When we asked what the vegetable of the day was, you obviously  guessed, it was fresh green beans.  Too tired after 9 hours of driving to think about, we ate quietly.  This continued across the country, for 7 more nights.  I’ll never forget Mom and I having dinner at the hotel in St. Joseph, Missouri, the 5th night on the road.  The waitress was very perky as she related the specials of the day, and was extra excited to inform us they had fresh green beans.  I actually screamed out loud, which lead to my Mom laughing so hard she launched her ice tea across the table.  The poor waitress could not figure out what she had done.  Once we calmed down, we explained our 5 day green bean odyssey.  We watched as she went from table to table, telling our story.  Bursts of polite laughter rolled through the restaurant, like the wave at a football game.

I learned to prepare green beans a little bit differently, while working in a restaurant.  Did you know, a lot of vegetables are cooked with dry vermouth and often  a spoonful of baking soda?  The baking soda does help retain the bright color in most veggie’s, but it also adds a whollop of sodium.  Therefore, I forgo this trick, unless I need a really special photo!

Laura’s Green Beans

1 sweet onion, such as Maui or Walla Walla, diced

3-4 Tablespoons of olive oil

1 cup dry vermouth

1 lb. fresh green beans, washed, trimmed, and strings removed

salt and pepper

optional – fresh dill

Heat the oil in a heavy skillet, that you can cover with a lid.  Sauté the onion until soft.  Add the green beans and continue to sauté about 5 minutes.  Pour in the vermouth, cover and simmer about 10 minutes.  Season with salt and pepper and fresh dill, if using!

Thanks for stopping by.

I hope your summer was memorable and you have a great evening.

Laura

Filed Under: Gardening, Paleo Friendly, Vegetables, Vegetarian Tagged With: fresh green beans

Bumper Crop Blueberry Pie

07/31/2014 by Laura 2 Comments

Our blueberry bushes are loaded with large berries in various stages of ripeness.  The weather has been just perfect for them.  I barely picked two gallons last year.   I have picked about 4 gallons already.

blueberries 9.2

So what do you do with an abundance of blueberries?  You make pie, of course!  This time, I made two.  One for a friends birthday and one for my nephew, who just finished his bar exams.  Lots of reasons to celebrate with pie.

bb pie 019.2

Laura’s Blueberry Pie 

pastry for 2 pies – detailed pie crust instructions here

Preheat the oven to 450′.

8-10 cups of blueberries, picked over to remove stems, leaves and green berries then rinsed and drained

2 cups of sugar

1 teaspoon cinnamon

1/2 cup quick cook tapioca

1/4 cup flour

4 ounces of butter

Prepare crust for two pies – or 1/2 recipe, one pie

Mix the berries, sugar, cinnamon, tapioca and flour together in a large bowl,  very gently.

Pour the mixture into the prepared pie pans.

Cut two slices of butter into 4th’s and dot the pie with the butter.

bb pie 008.2

Add the top crust.  Trim evenly as shown in detailed pie crust instructions linked above.  If you like, add little cut outs made from the remaining dough.  Brush the crust with milk and sprinkle with sugar.  Place each pie on a baking sheet lined with parchment paper.  This makes the spill over a breeze to deal with!

bb pie 017.2

Bake for 10 minutes at 450′.  Reduce heat to 350′ and bake another 40 minutes.  Rotate pies half way through the baking process.  Let cool completely and then refrigerate.  Serve with a big scoop of your favorite vanilla ice cream.

bb pie 016

I almost forgot to mention…There is one more celebration happening today.  Cooper is turning 3 years old and has officially been a part of our family for two years!  (We adopted him on his 1st birthday.) It is traditional for our dogs to get an ice cream cone on their birthday!  Happy 3rd Birthday Cooper, and many more!

cooper bd 003.2


Filed Under: Baking, Dessert, Gardening, Vegetarian Tagged With: blueberries, dessert, pie

Sweet Corn and Zucchinni Sauté with Basil and Chevre

07/01/2014 by Laura 1 Comment

This is my favorite time of the year!  Dinners are quick and simple.  Inspiration comes from what is on hand from the last visit to the farmers market, and  what is ripe in the garden.  The zucchini is now producing.  If you have grown zucchini yourself, you know you need to check the plant every single day, under every single leaf or risk finding an 8 pounder that results in 15 loaves of zucchini bread!   I have been checking everyday, and luckily I found two manageable zucchini.  I was also lucky enough to find plenty of basil, a few Anaheim chilies and a sprinkling of ripe tomatoes.  Unheard of this early in the season in Seattle, but hey, I’ll take it.  Don’t you love the nasturtiums?  They just seem to shout “summer”!

Corn and Zucchini SAute

We had planned on bbq’d chicken and corn on the cob for a quick dinner.  I love fresh, sweet corn but I prefer it OFF the cob.  I know that is weird, maybe it’s due to a mouthful of braces and retainers as a kid, but I just don’t find a lot of pleasure in knawing the kernels off the cob.  Armed with what I found in the garden and what was in the fridge, I came up with this quick sauté. It was delicious.  If you’re like my Mom and don’t like chevre, you could easily use a little parmesan or feta, or even no cheese at all!  Be creative, use what you have on hand and adjust the proportion of the ingredients to your taste!

For the Sweet Corn and Zucchini Sauté

olive oil for sautéing

salt and pepper

2 small zucchini, sliced in thirds and then diced

2 ears of corn, kernels sliced away from cob (Place the corn in a bowl, use a very sharp knife to cut the kernels away)

Removing cob from the cob

1 small, sweet onion

1 large Anaheim chile, chopped fine

1 diced tomato or a handful of cherry tomatoes, halved

1-2 Tablespoons fresh basil chiffonade

2-4 Tablespoons crumbled chevre, or any other cheese you prefer

Warm the olive oil over medium heat in a sauté pan.  Sauté the diced onion and green chili until soft.  Add the zucchini and tomatoes.  (I also threw in a little purple salad onion I accidentally pulled up!)

corn saute 029.2

Season with fresh ground salt and pepper.  Sauté about 5 minutes and layer the corn on top of the pan.  Reduce the heat to low, cover and let the corn steam, about 5 more minutes.  Do not over cook.   You want the corn to remain a little crispy.

Zucchini and Corn Saute

When ready to plate, scoop onto a serving dish, garnish with the basil chiffonade and crumbled chevre.  Serving this at room temperature is perfectly fine.  Serve this over brown rice or quinoa for a hearty vegetarian main dish.

Corn and Zucchini Saute


Filed Under: Gardening, Quick - Week Night, Vegetables, Vegetarian

Roasted Strawberry Rhubarb Ice Cream

06/02/2014 by Laura 1 Comment

I am committed to using everything in my garden when it is ripe.   Saturday, it was a small bowl of strawberries and a few stalks of rhubarb.  Inspired by memories of fresh strawberry rhubarb pie and ice cream – it struck me!  Why not skip the pie and put the roasted fruit in the ice cream?  Neither my husband nor my mom sounded very enthused when I shared my idea, but that did not stop me!

ice cream 012.1

Remove the stems from the strawberries.  Chop the rhubarb into small pieces.  Place all in a baking pan and sprinkle with about 1/2 cup of sugar.  Roast at 375′ for about 30 minutes, until the fruit is soft and caramelized.  Place in bowl and chill thoroughly.

ice cream 019.1 ice cream 021.1

I am not sure how or when we ended up with the ice cream attachment for our Kitchen Aide mixer!  As committed as I am to using all that my garden produces, I am also (newly) committed to using the wide assortment of “I must have this”  (never used) kitchen gadgets I have accumulated.  So, last weekend the ice cream attachment went from the box to the freezer, ready for it’s first performance.

Roasted Strawberry Rhubarb Ice Cream

I chose David Liebowitz Vanilla Ice Cream recipe.   As I have never made ice cream before, I thought a tried and true recipe was the best place to start!  I used organic milk, sugar and cream.

Vanilla Ice Cream

About 1 quart (1l)

  • 1 cup (250ml) whole milk
  • A pinch of salt
  • 3/4 cup (150g) sugar
  • 1 vanilla bean, split lengthwise
  • 2 cups (500ml) heavy cream
  • 5 large egg yolks
  • 1 teaspoon pure vanilla extract.

1. Heat the milk, salt, and sugar in a saucepan. Scrape the seeds from the vanilla bean into the milk with a paring knife, then add the bean pod to the milk. Cover, remove from heat, and infuse for one hour.

2. To make the ice cream, set up an ice bath by placing a 2-quart (2l) bowl in a larger bowl partially filled with ice and water. Set a strainer over the top of the smaller bowl and pour the heavy cream into the bowl.

ice cream 035.1

3. In a separate bowl, stir together the egg yolks.  Rewarm the milk then gradually pour some of the milk into the yolks, whisking constantly as you pour. Scrape the warmed yolks and milk back into the saucepan.

4. Cook over low heat, stirring constantly and scraping the bottom with a heat-resistant spatula, until the custard thickens enough to coat the spatula.

ice cream 047.1

5. Strain the custard into the heavy cream. Stir over the ice until cool, add the vanilla extract, then refrigerate to chill thoroughly. Preferably overnight.

ice cream 049.1

6. Remove the vanilla bean and freeze the custard in your ice cream maker according to the manufacturer’s instructions.  Add about 1/4 cup of the chilled strawberry rhubarb mixture during the last 7 minutes of mixing / freezing time.

ice cream 064.1

ice cream 065.1

ice cream 099.1


Filed Under: Baking, Dessert, Gardening Tagged With: Ice Cream, Rhubarb, srawberry

Spring has sprung….the crops are in!

05/19/2014 by Laura 2 Comments

I cannot believe it’s been over a month since the last post!  Things got a little busy around here… plants needed to be planted, walls needed to be painted, an injured dog needed tending (Jasper dislocated his hip – he is fine now), and…. there was asparagus.  I have written about this treasure of Spring a few times, but it is one of the biggest reasons I have not been posting any recipes.  We (mostly me) have been eating it constantly!  There was halibut with asparagus, salmon with asparagus, lamb chops with asparagus, steak with asparagus, poached eggs with asparagus, asparagus risotto and asparagus quiche.   Would you really have come back if I posted 20 meals in a row featuring asparagus?  Well, some of you would, but not all!

garden 080

And….there was the garden.  While soil prep and weeding do not create many photo ops or stories to tell, they are necessary steps for success.  Since our weather has been very mild and the sun and rain are working in concert, I took a chance and planted things a little early.   The zucchini and the basil may be premature, but they are easily replaced if the weather should turn!  Strawberries, raspberries and blueberries all look like we will have bumper crops this year!

garden 047

I found good size tomato plant starts in all my favorite varieties.  Green Zebra, Black Prince, Juan Flamme, San Marzano, Sungold, and Early Girl.  I also planted peppers, cucumbers and summer squash.   There are beans, and peas and fennel, Brussels sprouts, garlic, basil, bok choy, radishes and lettuce.   I cannot wait to create  meals from the garden.

garden 027

garden 040

garden 041

Our vegetable garden nourishes our bodies…..while our back yard garden nourishes our soul.  I am so pleased with the flowers this year.  The consistent and proportional rain and sun have created a beautiful landscape.  I hope you all get out there and plant something!   As Audrey Hepburn once said:

“To plant a garden is to believe in tomorrow.”

garden 011

garden 016

garden 019

Filed Under: Gardening, Vegetables

Heirloom Tomato, Basil and Buratta Salad

09/07/2013 by Laura 3 Comments

I hesitated posting this, as it is so simple. Then I thought about February in Seattle.  I will want to look at these photos in a few months to remind myself there is hope….the rain will stop, the sun will shine,  the ground will thaw, we will plant a garden, and we will have gorgeous heirloom tomatoes once again.

passport 015

We are to have a few more record-breaking days in the low to mid-eighties this week.  The best summer I can remember in Seattle.  Knowing the tomatoes will soon stop, I decided to treat myself one (hopefully not, but probably so) last time to an heirloom tomato, basil and burrata salad.  It was the perfect chance.  Dave was away at a gig,  and I did not need to prepare a full meal.  Dave does not like burrata nor would he ever consider a tomato salad a meal.  He would probably fall over dead to know we paid $30 for this at Boulevard in San Francisco last summer!  Anyway, spring for the buratta and heirloom tomatoes(if you don’t have them in your garden)….treat yourself, it is worth it!

passport 014

Buratta, Heirloom Tomato and Basil Salad

Heirloom Tomatoes

Basil

Buratta

Fruity Olive Oil

Balsamic Vinegar or Balsamic Glaze

Fresh Ground Salt and Pepper

I arranged my tomatoes and cheese on a pile of wild arugula, which is not visible.  (Also something I love that Dave does not care for!) Garnish with fresh basil, cracked pepper and salt and a drizzle of EVOO and balsamic. ENJOY!

passport 019

Filed Under: Appetizers, Gardening, Quick - Week Night, Salads, Vegetables, Vegetarian Tagged With: arugula, balsamic vinegar, basil, EVOO, heirloom tomatoes

Summer In a Jar…Fresh Basil Pesto

08/29/2013 by Laura 2 Comments

Just like everything else in the garden, the basil was ready to be “dealt” with! What could possibly be better than Fresh Garden Pesto?  If only you could have smelled the aromatic combination of basil, garlic, pine nuts, oil and cheese as it whirled together in the food processor; forming the most undeniably summeriest and tastiest of all condiments!  We managed to stock the freezer with 3 pints of this little slice of summer.  I’m already thinking about a Thanksgiving turkey sandwich with pesto mayonnaise or a bowl of fresh tomato soup on a rainy January day, brightened by a swirl of pesto.  Oh yeah, we like it on pasta too!

pesto 082

Laura’s Fresh Basil Pesto

Inspired by: Ina Gartner’s Barefoot Contessa Parties!

1 1/2 cup pine nuts

15 cloves chopped garlic (more or less, your call)

10 cups packed basil leaves (no stems)

1-3 teaspoons kosher salt

1-2 teaspoons ground black pepper

4 cups, approximately, very good quality olive oil

2 cups freshly grated Parmigiano-Reggiano cheese

Food processor fitted with the sharp blade

You will need to adjust these ingredients proportionally based on how much basil you are trying to use.  Additionally, the water content of the basil itself, will impact the amount of oil needed.  The quality and flavor of the pesto is determined by the quality of the basil, oil, cheese and nuts you use.

Start by pulsing the pine nuts and the garlic  in the food processor, until they are coarsely chopped and evenly combined.

pesto 006.1

Add the basil leaves in batches and continue to pulse the mixture to thoroughly combine.

pesto 032.1

Once all basil has been incorporated, it is time to drizzle in the olive oil.  Work slowly, stop often, scrape down the sides of the bowl, and continue to add oil until the pesto has reached your desired consistency.

pesto 056.1

Add salt and pepper.  Adjust to your taste.  Toss in the grated cheese and give it one more brief whirl!  Spoon into clean glass jars or freezer containers.  If freezing, be sure to leave about 1/2 inch of head space to allow for expansion.  Add a thin layer of olive oil before sealing to ensure basil does not turn brown.

pesto 063.1

When the Fall rains come followed by the Winter snow, you can laugh them off, knowing you have a few jars of summer, tucked away in your freezer.

Filed Under: Gardening, Pasta, Preserving, Vegetarian Tagged With: basil, garlic, pesto

Summer Harvest: Peach and Roasted Beet Salad, Garden Bruschetta and Half Sour Pickles

08/10/2013 by Laura Leave a Comment

This week, I tried to keep pace with everything the garden was throwing at us!  There were pickles to be made, raspberries to be preserved, green beans, beets, peaches that had to be eaten.  What can I say, it’s a tough job and somebody’s got to do it!

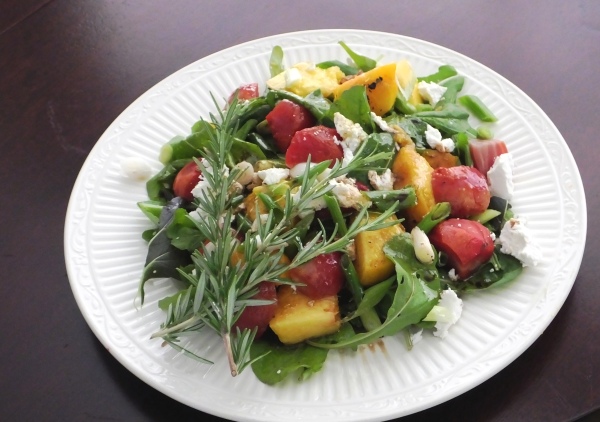
First up is a wonderful, refreshing Peach and Roasted Beet Salad.  Yup – you read that right!

8.10.13 030.1

The recipe is inspired by one I found on our local co-ops website, PCC Natural Markets.

Ingredients

  • 10 to 12 small beets: red, yellow and Chiogga
  • 3 green onions, sliced in 1/4′ slices on the diagonal
  • 2 yellow peaches or nectarines, peeled, seeded, grilled, cooled and sliced into chunks
  • 5 ounces baby arugula
  • 2 ounces crumbled goat cheese

For the Dressing

  • 1/2 cup fresh orange juice
  • 1/4 cup balsamic vinegar
  • 1/4 teaspoon unrefined sea salt
  • Fresh ground black pepper
  • 2 teaspoons fresh thyme
  • 1/2 cup olive oil

Scrub the beets.  Place in a roasting pan, toss them in a generous dash of olive oil.  Roast them at 350′ for about 35 minutes or until you can easily insert a knife tip into the largest one.  Put the beets in a zip lock bag and place them in the refrigerator.  Once cool, the skins will slide right off.

I grilled the peaches for a few minutes to intensify the flavor.  I chilled them before assembling the salad.

Combine the dressing ingredients in a jar.  Shake well, and refrigerate.

To plate the salad:  Arrange the arugula, beets, peaches on a serving plate.  Add the diced onions.  Garnish with the crumbled goat cheese  a sprig of rosemary.  Drizzle with the dressing.

Sautéed Green Beans, Laura’s Way!

Green beans have been a part of summer my entire life.  My grandpa grew them, my mom grew them and I continue to grow them today.  I remember one summer driving with my mom, cross country for one of their West Coast to East Coast moves.   Every dinner, for two weeks, was served with green beans!  I’ll never forget the look on the server’s face at the restaurant in Springfield, MO, when I let out a big “OH NO” after asking her what the vegetable of the day was!   We explained our situation, and we all had a good laugh!

8.10.13 015.1

Sauté a diced, sweet onion in a good amount of olive oil in a large sauté pan, that has a lid.  Add a desired amount of diced bacon (or not) and cook most of the way done.  Add the beans.  I had a combination of wax beans and Royal Burgundy purple beans (they turn green when they cook).  Saute about 5 minutes.  Add about 3/4 cup of DRY VERMOUTH.  Yup – an old restaurant trick. Bring to a slow simmer, cover, and steam about 20 minutes.  Season with salt and pepper and fresh dill.

Garden Fresh Bruschetta

One of our favorite summertime treats is straight from the garden bruschetta. Diced tomatoes, finely chopped garlic and fresh sliced basil, all tossed with the best olive oil and placed on a toasted slice of baguette!  YUMM!  We had some fresh mozzarella on hand, so I added a pinch to each, glorious serving.

8.10.13 062.1

8.10.13 051.1

Half Sour Pickles

I absolutely LOVE the fresh, bright green pickles that are served “all you can eat” style at any good deli!  I had no idea how simple they were to make!  Thanks to a very productive pickling cucumber plant, I now have my own  jar of half sours, bubbling away in my refrigerator.  I found the recipe in The Victory Garden cookbook.

pickles 008.1

Ingredients

12 pickling cucumbers, about 3-4″

4-5 cloves of garlic (original recipe calls for 1)

6-8 sprigs fresh dill

1/2 teaspoon dill seeds

1 tablespoon pickling spices

1/4 cup kosher salt

1/4 cup white vinegar

2 1/2 quarts of water

Thoroughly clean the cucumbers.  Halve or quarter them.  Wash the dill.  Peel and flatten the garlic.  Pack the cucumbers, dill, garlic, dill seed and pickling spice in a large glass jar, a pickle crock or a big glass bowl.  You will want to make sure the pickles will be covered with at least two inches of the water.

Bring the salt and the water to a boil.  Boil a full two minutes.  Pour the brine over the cukes.  Cover the jar with cheesecloth and secure it with a rubber band.  Let the pickles sit on your counter for 2-3 days.  The brine will get cloudy as fermentation occurs.  Once fermented to your taste, add the 1/4 of vinegar, cover and refrigerate.  They will keep forever under refrigeration, but believe me, they won’t last that long!

Raspberry Jam

I am not quite sure what motivated me to purchase a flat of raspberries at the farmers market, with everything else going on!  I do have raspberries in the garden, but only enough to add to my morning yogurt or smoothy each day.  You can see, they were hard to resist.  I love using raspberry jam in my thumbprint cookies at Christmas.  This year, they will be extra special 100% home made!

farmers market and risotto 013

Raspberry Jam*

I used 6 pints of fresh raspberries, about 4 cups of sugar, and the juice of one lemon.  I mashed the berries a bit with a potato masher.  I cooked the berries, sugar and lemon juice to a temperature of 220′, per my candy thermometer.  I processed the jam in 12 1/2 pint jars, for about 20 minutes.  It is absolutely delicious!

jam 015.1

*Note – there are 100’s of fabulous step by step instructions on the internet, for canning jams.  I was in a hurry and did not shoot the entire process, just the final product.  It is fun and easy and I encourage you to give it a try with your favorite fruit or berry!

Filed Under: Gardening, Salads, Vegetables, Vegetarian Tagged With: basil, beets, bruschetta, garlic, green beans, peaches, pickles

Farming in the City….3 Weeks Later

05/31/2013 by Laura Leave a Comment

…UPDATE ON THE CROPS

After a few recording breaking warm days and 3 weeks of alternating rain and sun, rain and sun….things are really growing.   Hopefully you can  tell we have a new camera.  We are still learning how to use it.  We purchased a Fugi HS50 EXR.  It is pretty “dummy proof” on the auto settings!

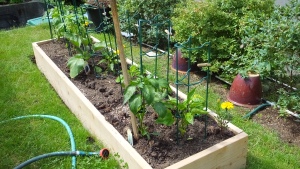
The early crops are in the raised bed shown here.  Kale, spinach, radishes, leeks, arugula, beets and snow peas.  Mixed in with those are a cucumber, zucchini, yellow crook neck squash and patty pan summer squash.  I am growing these upward, in the cages.  There will be plenty of room for them when the early crops have been harvested.

DSCF0141

Dave built  a new raised bed for this year.  We are calling it the “Salsa Garden”.  So far it contains Poblano Pepper, Eggplant, Anaheim Chiles, Jalapeno Pepper, Tomatillos and a bell pepper.  I will add cilantro soon.  To the right of this garden are the blueberry bushes.  They are about 8 years old now and are absolutely loaded with baby berries.  Pie, jam, chutney are forthcoming!

DSCF0144

We also have raspberries and June bearing strawberries.  Dave just finished reinforcing the raspberry trellis.  The yellow raspberries are amazing.  We added two NW grape plants, which will eventually cover the top trellis.

DSCF0148.1

DSCF0147.1

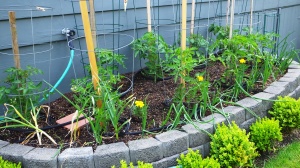
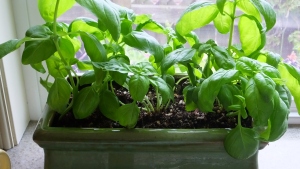
Below is the tomato bed.  There are also Walla Walla sweet onions here, and will eventually house the basil plants that are currently safe and sound on the kitchen window sill.  There are 9 tomato plants, 8 varieties.  Green Zebra (our favorite), Mr. Stripey, Black Krim, Juane Flamme, Sweet Baby Girl, Gold Nugget, Brandywine, and San Marzano.  They are loaded with blossoms!

DSCF0145.1

DSCF0126

The herb garden and the romaine lettuce are doing fantastic!

DSCF0142

The bed below has a few rows of green beans and a couple more squash plants.

DSCF0143

Dave is growing his “prize winning” potatoes in a big tub this year.  They will be converted to potato salad on the 4th of July!

DSCF0149

Filed Under: Gardening

  • 1
  • 2
  • Next Page »

Looking for a particular recipe? Search here!

Stay in touch!

Enter your email address to subscribe to More Savory Less Sweet, and receive notifications of new posts by email.

What we’re doing when we’re not blogging!

Follow on Instagram
This error message is only visible to WordPress admins
Error: There is no connected account for the user 17841401233545030.
Foodista Food Blog of the Day Badge

Copyright © 2023 · Lifestyle Pro Child Theme for More Savory, Less Sweet on Genesis Framework · WordPress · Log in