• About the Author
  • Recipe Index
  • Contact Me
  • The Kitchen Crew
  • The Legal Necessities

More Savory, Less Sweet

Adventures in Food - Taste, Explore, Inspire and Share

Grilled Pesto Rubbed Chicken, Caprese Salad and Summer Squash

08/06/2014 by Laura 1 Comment

I love the emails I receive every Monday morning from Saveur with Simple Weeknight Meal suggestions.  This weeks Pesto-Rubbed Chicken grabbed my attention as I had both pesto and a chicken on hand.  It’s still too hot to cook inside so knowing I could make this dish on the grill was a huge bonus.  I did not make the Panzella salad suggested with the recipe, but I did throw together a quick Caprese salad with fresh garden tomatoes, basil, and mozzarella.  I grilled yellow summer squash and zucchini to serve alongside.  It was a quick and flavorful meal.  I will be turning the leftover chicken into amazing pesto chicken salad sandwiches.  Stay tuned!

PESTO CHICKEN AND BIRDS 074.2

for the Pesto-Rubbed Grilled Chicken

1 whole chicken, 3-4 pounds – I chose to spatchcock it as it is so easy to grill that way!

4-6 ounces pesto, any flavor you like.  My recipe is here.

My pesto is traditional Pesto Genovese.  This preparation would be amazing with roasted red pepper pesto!

olive oil

salt and pepper

Loosen the skin on the chicken.  Add the pesto under the skin and spread evenly with your hand.  Work your way  around the chicken until all the meat under the skin  is covered with pesto.  Rub the both sides of the chicken with about 2 Tablespoons of olive oil.  Season generously with freshly ground salt and pepper.  Rub the remaining pesto on the outside of the chicken.  Heat the grill to 450′.  Place the chicken on the grill skin side down.  Cook for about 20 minutes.  Turn and cook another 20 minutes.  Insert a thermometer to test for doneness.  It should be at least 165″ in thickest part.  Let chicken rest 10 minutes and then cut into serving pieces.

PESTO CHICKEN AND BIRDS 032.2

PESTO CHICKEN AND BIRDS 061.2

PESTO CHICKEN AND BIRDS 066.2

PESTO CHICKEN AND BIRDS 068.2

for the Caprese Salad

fresh garden heirloom tomatoes, sliced into serving sizes

fresh mozzarella, sliced into serving slices

fresh garden basil, torn

fresh cracked pepper and coarsely ground salt

very good quality fruity olive oil.  My favorite is California Olive Ranch Arbequina

lettuce “cups” for serving

Layer the tomatoes, cheese and basil in the lettuce cups.  Drizzle with olive oil.  season with the salt and pepper.  I also make this with fresh burratta frequently throughout the summer.

for the Grilled Summer Squash and Zucchini

Slice the squash into thick slices.  Brush with olive oil and season with salt and pepper.

Grill on each side about 5 minutes, being careful not to over cook.  Remove from grill, let rest.  Slice for serving.  Drizzle the squash with a little olive oil and balsamic vinegar or glaze.  Season with salt and pepper.

We had an amazing visitor while we were grilling this meal.  A beautiful Peregrine Falcon decided to hang out for awhile in a cedar tree in our yard.  He was absolutely stunning!

falcon 002.2


Filed Under: Poultry, Quick - Week Night Tagged With: basil, chicken, grilled, mozzarella, pesto, tomatoes, zuchinni

Manicotti with Three Sauces

08/03/2014 by Laura 1 Comment

We were watching the food channel the other night; Diners, Drive-Ins and Dives, I think.  As we tuned in at the end of an episode, we caught a glimpse of a cannelloni with three sauces.  Dave, my nephew and I all commented that it looked really good.  The three sauces pesto, béchamel and marinara were layered on the cannelloni to represent the Italian flag.  So when the daily conversation turned to “what shall we make for dinner” I decided we would give it a whirl.  I had homemade pesto and marinara in the freezer and béchamel sauce only takes a couple of minutes.   We took a quick survey of the pantry and only needed a few things.  I usually use spinach and mushrooms in my filling, but since it is August and there are zucchini piled high in the veggie drawer, I decided that would be the “green” in the filling.   I think my nephew went home one day too soon!

manicotti 063.2

For the Manicotti 

1 – 1 lb. chub of Italian Chicken Sausage

3/4 cup finely diced onion

4 cloves of fresh garlic, minced

3/4 cup of small dice zucchini

2 Tablespoons freshly chopped Italian parsley

2 Tablespoons freshly chopped  basil

salt and pepper

olive oil for sautéing

1/2 cup dry white wine, to deglaze the pan

1  1 lb. container whole milk ricotta

2 eggs

3/4 cup of mozzarella, finely diced

(I like diced over shredded as you get little gooey cheese puddles in the filling!)

1/4 cup grated parmesan

12-16 manicotti tubes, boiled according to package directions

For assembly and serving

2/3 cup of prepared pesto

2 cups prepared marinara sauce

1 cup béchamel sauce

Add 2-3 tablespoons olive oil to a large sauté pan and heat over medium heat.  Add the sausage and break up the chunks while cooking.  Add in the zuchinni, onion and garlic and continue to cook until the vegetable are soft and the meat is browned.  Add the white wine, stir and let simmer about 5 minutes until the liquid has evaporated.  Season with salt and pepper.  Remove from stove, pour into a large mixing bowl and let cool.

manicotti 008.2


While the meat and vegetable mixture cools, prepare the manicotti.  Boil for about 5 minutes.  Drain and rinse with cold water.  Set aside until ready to stuff.

In a small bowl, mix together the ricotta, eggs, diced mozzarella and parmesan.  Add to the cooled meat and vegetable mixture and mix well.   Prepare a baking dish by lightly oiling it.

Fill the pasta tubes.  I used a very small spoon to stuff them.  When we finished Dave said “we should have used a pastry bag”!  Of course we should have used a pastry bag….what was I thinking?

manicotti 015.2

Lay the filled tubes into the baking pan.   Heat the oven to 350′.  Add 3-4 Tablespoons of water to the baking pan and cover tightly with foil.  Bake about 20 minutes and remove from oven.

While the pasta is baking, warm the marinara sauce in a small pan on the stove, prepare the béchamel sauce and pesto.

Basic Béchamel Sauce

4 tablespoons butter

1/4 cup finely diced onion

2 cloves finely minced garlic

1/3 cup Wondra flour

1/8 teaspoon freshly ground nutmeg

1/4 cup grated parmesan

salt and pepper.

Melt the butter in a saucepan over medium heat.  Add the onion and garlic and sauté until the vegetables are soft.  Whisk in the flour to make a light roux.  Slowly add the milk and continue to simmer until thickened.  Add the cheese, nutmeg and salt and pepper to taste.  Set aside.  In a small bowl, mix about two tablespoons of béchamel into the 2/3 cup of pesto.

Remove the pasta from the oven.  Layer the sauces on to the pasta in the desired fashion.  My choice was three separate “sections”.  You certainly could layer marinara, then béchamel and then pesto, one on top of the other.  Return the pasta to the oven, uncovered and bake another 10 minutes.  Garnish with grated cheese and freshly chopped Italian parsley, and touch up the sauces, if needed.

manicotti 051

 Buono appetiteo!


Filed Under: Pasta, Poultry Tagged With: bechamel, Italian, italian chicken sausage, manicotti, marinara, mozzarella, parmesan, pasta, pesto, zucchini

Savory Tomato Tart with Pesto, Mascarpone and Ricotta Filling – and Detailed Pie Crust Instructions

09/04/2013 by Laura 1 Comment

The tomato “situation” continues at our house.  Don’t think I am not grateful for the bounty of fruit this summer!  It is just sad that the season is so short and it happens all at once!  After making 8 quarts of sauce this weekend, I still have about 30 pounds of tomatoes, in varying stages of ripeness.

I searched the internet for a Tomato Tart recipe that would incorporate all the things in my refrigerator that I needed to use up.  Pesto, Mascarpone, Ricotta, Parmesan…. I found variations, but not exactly what I wanted.  Below is the combination I came up with.  It was quite yummy!

tart 139.2

Laura’s Tomato Tart

Prepare the crust

Pie crust preparation has been revolutionized by the food processor!  I only started making crust about 3 years ago.  Up to that point, I used the frozen or refrigerated options.  There were a couple of good reasons:  First, I really did not have a proper counter to roll out dough, until the kitchen remodel in 2010!  Second, I think I inherited “fear of dough” from my Mom.  I will never forget walking in the door from school at about age 10, just in time to hear my Mom let out a word I had not heard her use before, while watching the dough, bowl and rolling-pin go into the garbage can!  I don’t remember what happened after that…. I don’t think there was a pie!  Anyway, if you have a food processor, make the crust from scratch.  It is worth the effort and you know exactly what is in it!  Detailed instructions below.  This is a very easy dough to work with.

(The Crust Recipe is Ina Garten’s, from Barefoot in Paris, 2004)

1 1/2 cups regular flour, plus more for dusting the board

1/2 teaspoon Kosher salt

12 tablespoons cold unsalted butter, divided

3 to 4 tablespoons ice water

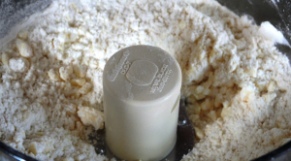
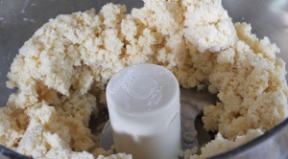
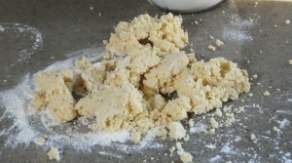
Have all your ingredients ready to go. (pic 1) Put the flour and 1/2 teaspoon salt in the bowl of a food processor fitted with the steel blade. Cut 12 tablespoons (1 1/2 sticks) of the butter into large dice, add to the bowl, and (pic 2) pulse until the butter is the size of peas.  With the machine running, add the ice water a tablespoon at a time, and process until the dough becomes crumbly (pic 3). Don’t over process. (pic 4)Dump the dough out on a floured board, (pic 5) gather it loosely into a ball, wrap in plastic wrap and refrigerate for 30 minutes.

tart 002.1

tart 003.1tart 004.1

tart 007.1tart 008.1

Roll the chilled dough on a well-floured surface to desired thickness, and fit it into tart pan. Roll the pin over the top to cut off the excess dough.

(Thanks for the video and music, Dave!)

???????????????????????????????

tart 015

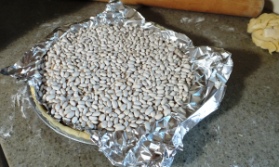
Cut a square of foil to fit into the pan.  Spray with olive oil spray on one side and place, oil side down, into the tart pan.  Fill the foil with beans or pie weights.

tart 038.1 tart 046.1

Bake for 20 minutes. Remove the beans and foil from the tart shell, prick the bottom all over with a fork, and bake for another 10 minutes.

tart 065.1

Prepare the filling

Place all ingredients in a bowl and mix well.  Chill in refrigerator until ready to use.

8 oz. Mascarpone cheese

8 oz. Ricotta cheese

1 cup grated Parmesan

2 eggs

3 Tablespoons Pesto

Salt and Pepper

tart 010

Prepare the tomatoes

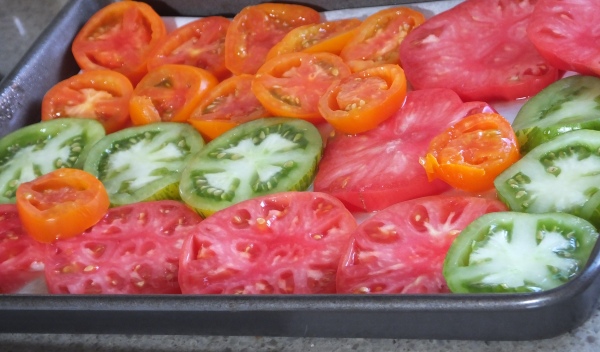
Line a baking pan with parchment paper and spray lightly with olive oil spray.  Slice the tomatoes into fairly thick slices and place on the paper.  Season with salt and pepper and roast at 350′ about 15 minutes.  Set aside until ready to top the tart. (Pre-roasting ensures the tart will not get too watery.) Tomato varieties below are Brandywine, Green Zebra and Juane Flamme.

tart 012.1

Assemble the Tart

Pour the prepared cheese mixture into the pre-baked tart shell.  Bake 75% of the way done – about 40 minutes at 350′.  Place the roasted tomatoes on top and return the tart to the oven for another 10 – 15 minutes, until firm.  Serve the tart at room temperature, with a little fresh basil sprinkled on top.

tart 134

Filed Under: Appetizers, Baking, Quick - Week Night, Vegetarian Tagged With: mascarpone cheese, pesto, pie crust, ricotta, tomato

Summer In a Jar…Fresh Basil Pesto

08/29/2013 by Laura 2 Comments

Just like everything else in the garden, the basil was ready to be “dealt” with! What could possibly be better than Fresh Garden Pesto?  If only you could have smelled the aromatic combination of basil, garlic, pine nuts, oil and cheese as it whirled together in the food processor; forming the most undeniably summeriest and tastiest of all condiments!  We managed to stock the freezer with 3 pints of this little slice of summer.  I’m already thinking about a Thanksgiving turkey sandwich with pesto mayonnaise or a bowl of fresh tomato soup on a rainy January day, brightened by a swirl of pesto.  Oh yeah, we like it on pasta too!

pesto 082

Laura’s Fresh Basil Pesto

Inspired by: Ina Gartner’s Barefoot Contessa Parties!

1 1/2 cup pine nuts

15 cloves chopped garlic (more or less, your call)

10 cups packed basil leaves (no stems)

1-3 teaspoons kosher salt

1-2 teaspoons ground black pepper

4 cups, approximately, very good quality olive oil

2 cups freshly grated Parmigiano-Reggiano cheese

Food processor fitted with the sharp blade

You will need to adjust these ingredients proportionally based on how much basil you are trying to use.  Additionally, the water content of the basil itself, will impact the amount of oil needed.  The quality and flavor of the pesto is determined by the quality of the basil, oil, cheese and nuts you use.

Start by pulsing the pine nuts and the garlic  in the food processor, until they are coarsely chopped and evenly combined.

pesto 006.1

Add the basil leaves in batches and continue to pulse the mixture to thoroughly combine.

pesto 032.1

Once all basil has been incorporated, it is time to drizzle in the olive oil.  Work slowly, stop often, scrape down the sides of the bowl, and continue to add oil until the pesto has reached your desired consistency.

pesto 056.1

Add salt and pepper.  Adjust to your taste.  Toss in the grated cheese and give it one more brief whirl!  Spoon into clean glass jars or freezer containers.  If freezing, be sure to leave about 1/2 inch of head space to allow for expansion.  Add a thin layer of olive oil before sealing to ensure basil does not turn brown.

pesto 063.1

When the Fall rains come followed by the Winter snow, you can laugh them off, knowing you have a few jars of summer, tucked away in your freezer.

Filed Under: Gardening, Pasta, Preserving, Vegetarian Tagged With: basil, garlic, pesto

Ravioli with Creamy Pesto, Roasted Cherry Tomatoes, Basil, and Pine Nuts

08/01/2013 by Laura Leave a Comment

I absolutely adore summer when my garden, or the farmers market, dictate what is for supper.   Last week we purchased beautiful, locally made ravioli from La Pasta.  It has been in the back of my mind since we brought it home and popped it in the freezer.  Also in the back of my mind was a jar of “The World’s Greatest Pesto” (per the signage) that I brought back from Eataly a few weeks earlier.  While I have everything on hand to make pesto, it was one of those days I wanted something quick.  All this coupled with the bumper crop of ripe cherry tomatoes, I knew what we would make for dinner!

Raviolli 062.1

Ingredients

4-6 Ounces Pesto, homemade, store bought, your favorite one

6 ounces fresh cream

1 pound fresh ravioli (ours was a 4 cheese blend)

12 -15 oven roasted cherry tomatoes

1/2 cup toasted pine nuts

1/2 cup slivered basil, plus a little more for garnish

1/2 cup freshly grated parmesan cheese, plus a little more for garnish

Raviolli 006.1

Directions

Roast the cherry tomatoes in a 375′ oven in a small pan coated with olive oil, for about 15 minutes.  Season with salt and pepper before placing in oven.  Remove from oven and set aside.

Toast the pine nuts over low heat in a small frying pan.  Watch carefully as they easily burn.  Remove from heat and set aside.

Grate the parmesan cheese, set aside.

Slice the basil, set aside.

Fill a pasta pot with water.  Add salt, bring to boil.  Meanwhile – prepare the sauce.

Warm a large sauté pan over low heat.  Add a touch of olive oil.  Add in the pesto and warm.

Raviolli 010.1

Add the parmesan, the basil and the cream.  Stir gently to melt the cheese and warm the sauce.

Raviolli 025.1

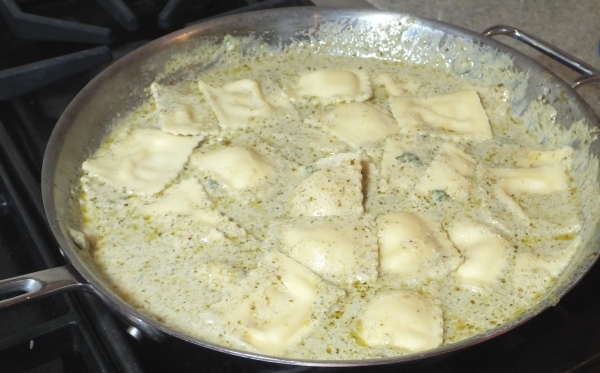
Prepare the ravioli according to directions. (Fresh ravioli usually cook perfectly in about 8 minutes.) Drain the ravioli.  Add to the sauté pan.

Raviolli 041.1

Add the toasted pine nuts, slivered basil and roasted tomatoes.  Garnish with parmesan cheese.  Serve with a cold, crisp salad, crusty Italian bread and a light Pinot Grigio.

Raviolli 052.1

Enjoy!

Filed Under: One Pot Meal, Pasta, Quick - Week Night, Vegetarian Tagged With: basil, pesto, pine nut, raviolli, tomato

Looking for a particular recipe? Search here!

Stay in touch!

Enter your email address to subscribe to More Savory Less Sweet, and receive notifications of new posts by email.

What we’re doing when we’re not blogging!

Follow on Instagram
This error message is only visible to WordPress admins
Error: There is no connected account for the user 17841401233545030.
Foodista Food Blog of the Day Badge

Copyright © 2023 · Lifestyle Pro Child Theme for More Savory, Less Sweet on Genesis Framework · WordPress · Log in