• About the Author
  • Recipe Index
  • Contact Me
  • The Kitchen Crew
  • The Legal Necessities

More Savory, Less Sweet

Adventures in Food - Taste, Explore, Inspire and Share

Search Results for: potato salad

Summer is Here…Potato Salad!

05/06/2013 by Laura Leave a Comment

Wow…80′ here in Seattle today.  What do we do when we get a glimpse of summer?  We barbecue chicken and make potato salad.   With the visit of my parents and the great weather, I knew it was potato salad time!  I have been making this recipe for years, and it is my favorite.  I think potato salad preferences are very personal and are likely based on what you grew up with.  My best friend makes her salad about the same way, only she adds pickles and pickle juice.  You can easily add any ingredients that make the salad your own!

???????????????????????????????

Ingredients

This makes a “party size” batch of salad.  You can cut the recipe in half if needed.

5 pounds small red potatoes

3/4 cup apple cider vinegar

10 eggs, hard-boiled

1 medium purple onion, diced

1 medium sweet onion, diced (Maui or Walla Walla)

1 bunch green onions, sliced, including tops

2 cups chopped celery

1/4 cup finely chopped parsley

2 Tablespoons celery seed

1 Tablespoon celery salt

1 Tablespoon kosher salt

1/2 tablespoon black pepper

2 cups mayonnaise, whatever kind you prefer

2 Tablespoons prepared yellow mustard

paprika for garnish

Scrub the potatoes and remove any blemishes.  I do not remove the peels.  Put them in a large pot of water and bring to a boil.  Simmer for about 20 minutes, until fork tender.  Drain the potatoes in a colander for about 15 minutes.  Place the potatoes in a non-reactive bowl.  Pour the apple cider vinegar over the potatoes, cover with plastic wrap and refrigerate overnight.

Cook the eggs at the same time.  Bring them to a boil, turn off heat, cover and let set for 10 minutes.  Rinse in cold water and refrigerate overnight.

???????????????????????????????

I always make the salad early, the morning I intend to serve it.  Chop the potatoes into bite size pieces.  There will be vinegar left on the bottom of the bowl.  Pour that over the chopped potatoes.

???????????????????????????????

Add the rest of the ingredients.  Gently mix all together.  Adjust for seasoning to your taste.  Pile into a serving bowl, sprinkle with paprika and chill at least 6 hours.

???????????????????????????????

Tender, Juicy Barbecued Chicken

After burning many pieces of chicken over the years, we finally got it right.  We turned down the heat and turned the chicken more frequently.  We also learned that it is easiest if all the pieces are the same size, like the chicken quarters below.

Heat grill to 350′.  Season the chicken with salt and pepper on both sides.  Cook the chicken a total of 40 minutes, or until temperature registers 165′ on a thermometer.   Turn the chicken every 10 minutes.  Baste with Chef Hak’s Chipotle Bourbon  BBQ sauce the last 10 minutes of cooking time!

potato salad 051

Be sure to try Chef Sharone Hackman’s Award winning BBQ Sauces.  Not heard of them?  Check it out here!

http://www.haksbbq.com/

chef hak2

Filed Under: Poultry Tagged With: potato, summer

Mediterranean inspired Chicken, Potato and Green Bean Sheet-pan Supper

03/08/2017 by Laura 2 Comments

I always thought that when I retired, (Yes, RETIRED!  More about that in an upcoming post.) I’d spend my days making elaborate meals!   Meals that took lots of planning, shopping for exotic ingredients and hours in the kitchen.  I’ve kind of surprised myself with my recent desire for simplicity.  Simplicity of ingredients, quick cooking and easy, often one pan,  clean up!  Additionally, anything I cook usually makes two appearances.  The roast chicken below became chicken salad for lunches, two days in a row.  I am sure I will continue to explore elaborate and exotic adventures in food, but they will not be as frequent as I’d thought they would be.

Sheet-pan suppers are gaining in popularity for good reason.  They are quick, nutritious, delicious one pan alternatives to the crock pot.  Don’t get me wrong, I love my crock pot for many things.  But, you will never get crispy skin on a chicken or roast potatoes, in a crock pot!  Also unlikethe crock pot, you can prep, cook and serve in 45 – 60 minutes, which fits in better with my current state of spontaneity!

For this recipe, I suggest you spatchcock your chicken.  It will cook quickly and evenly and provide a safe, steamy haven for the green beans.  If you do not know how to spatchcock a chicken….Google it and watch a video or two.  Alternatively, you could ask your butcher to remove the back bone for you.  Just make sure you retain it, for your scrap bag of chicken parts, for stock.

For the Mediterranean inspired chicken, potato and green bean supper

Organic ingredients whenever possible

1 half-sheet, sheet pan

1 fresh young chicken 3-4 pounds, preferably organic, spatchcoked and patted dry

7-8 cloves of garlic, minced

leaves from 4-5 sprigs of fresh oregano, minced

zest of one lemon, finely grated on a microplane

juice of zested lemon

Mix the garlic, oregano, lemon zest and lemon juice together in a small bowl with about 2 Tablespoons of olive oil

1 large lemon, sliced thinly

3/4 – 1 pound of fresh green beans, ends removed, uniformly sized

1 pound tiny red and gold potatoes, quartered

Salt and Pepper

additional olive oil

Drizzle a little olive oil on the sheet pan.  Pile the green beans in a tight pile, in the center of the pan.

Place the flattened chicken over the green beans, ensuring the beans are all tucked underneath it.

Drizzle olive oil over the chicken and massage it in!  Place a couple teaspoonful’s of the garlic, oregano and lemon mixture, under the skin.  Place a few lemon slices under the skin as well.

Place the potatoes around the chicken, in a single layer.   Drizzle the potatoes with the remaining herb mixture.  Toss well to ensure they are coated.

Season well with salt and pepper and Greek style seasoning.  (Greek blend offered by numerous spice companies.)


Pop it in a 400′ oven for 45-50 minutes, or until the temperature in the thigh registers 165′.

Let the chicken rest 10-15 minutes before serving.

I hope you will give this meal a try!

Thanks for stopping by.

Have a great evening,

Laura

Filed Under: One Pot Meal, Poultry, Quick - Week Night Tagged With: chicken, garlic, greek seasoning, lemon, one pan, oregano, quick, sheetpan

Skillet Steak with Pickle Salsa Verde and (not that big of a….) Hassleback Potatoes

01/15/2017 by Laura 2 Comments

I am sitting in my office surrounded by many things I love.  Over 300 cookbooks, my camera gear, yarn and knitting supplies and my connection to ya’ll.  On the dining room table is another pile of cookbooks, all fairly new releases, about 30 in total.  On my corner of the couch are a dozen more cookbooks from the library, unread copies of Food and Wine, my I Pad with bookmarked blog pages, and a basket with 3, ok 5, current knitting projects.  In spite of being surrounded by all this inspiration and creativity I still find it difficult to figure out what to make for dinner!

I am not brazen enough to say I’m making a NY resolution here, but I am going to share with you how we intend to get out of the “recipe rut” going forward.  Dave’s idea actually!  He came up with it one day when I was even  more frustrated then normal, and really struggling to come up with “something for dinner”.   Dave handed me a book from the top of the pile and said “open it, any page”.  “There”, he said, “that’s what’s for dinner”.  I might mention,  that this is the same guy that chose his daily outfit by whatever was on top in the laundry basket and advised me to do the same when dressing for the day!  Anyway, the book on the top of the pile was Sara Moulton’s newest book “Home Cooking 101, How to Make Everything Taste Better”.  I had turned to a flat iron steak recipe, to be cooked in a skillet. Since our grill was acting weird; because of the sub-freezing temperatures effect on the propane, I thought the skillet approach was fabulous.  I showed Dave the salsa verde recipe and he was not enthused.   The book recommended a soft, baked polenta as a side…not Dave’s first choice.  So, I flipped further into the book and chose Hassleback potatoes.  I’d never made them before.   They looked really good.   What’s not to love about a potato basted with butter and garlic….crisp on the edges and soft on the inside?  All set, decision made, we headed to the kitchen!

Again, all recipes adapted from “Home Cooking 101″ by Sara Moulton”

For the Pickle Salsa Verde

2 tablespoons finely chopped cornichons

2 teaspoons freshly grated lemon zest

1 tablespoon finely chopped capers

1 tablespoon minced shallots

1 tablespoon fresh lemon juice

1 teaspoon Dijon mustard

1 teaspoon red pepper flakes (more to taste, if desired)

1/4 quick light olive oil

Mix all the ingredients well.  Add in

1 1/2 cups medium chopped, fresh parley leaves, and stir.  Set aside while you prepare the steak and the potatoes.

For the Hassleback Potatoes

heat the oven to 400′

2 – 4 russet potatoes, or 1 potato per person

4-6 tablespoons unsalted butter

3 garlic cloves, smashed

2 sprigs of thyme

salt and pepper

Peel the potatoes.  Drop each potato into a bowl of cold water.  Work with one potato at a time, slice a small amount off the bottom of each potato to ensure it will sit flat.  Place the potato between 2 chopsticks on the cutting board. (Sara’s genius advice!) slice the potatoes into 1/8″ slices,  as shown.  The chopsticks will prevent your knife from cutting all the way through the potato.  Return the potato to the bowl of water until all are sliced.  Remove from the water and dry well.  Melt the butter in a small bowl in the microwave with the garlic and thyme. Brush each potato with the melted butter, getting in between the slices as much as possible.  Season with salt.  Bake 30 minutes.

Remove the potatoes from the oven.  Gently separate the slices with a bread knife and baste between all the slices with the butter. Return to the oven, and bake another 30-40 minutes, until crispy on the edges and soft in the centers.  Keep warm while you prepare the steak.

For the Skillet Steak

1 1/2 pound flank, flat iron or skirt steak, about an inch thick

Let the steak come to room temperature, about 15 minutes.  Pat dry with paper towels.  Dry steaks and hot skillets are friends!  Season the steaks as desired.  My favorite is Kosher salt and garlic pepper.

Heat 2 tablespoons of oil over medium-high heat in a heavy skillet.  I think cast iron is the best for searing a steak.  Sear the steak on each side, 3-4 minutes for rare, 4-5 minutes for medium rare.  Remember, your steak will continue cooking a bit while it rests!!!  Remove from skillet to a plate.  Cover loosely with foil and let rest for 8-10 minutes.  Slice the steak across the grain and plate.  Place a couple tablespoons of the salsa on each serving.

We enjoyed this meal very much alongside a broiled tomato and tossed green salad.  I loved the salsa….I love salty briny things.  It was not Dave’s favorite.  Those potatoes though…MAKE THE POTATOES.

I hope you have a great evening.  Thanks for stopping by.

Laura

Filed Under: Beef, Quick - Week Night Tagged With: hassleback, pickle, potato, salsa, seared, skillet, steak, verde

Grilled Halibut with Pico De Gallo and Avocado Salad

04/14/2014 by Laura 1 Comment

Dave and I spent a few hours at the Pantry at Delancey on Sunday afternoon, “sharpening” our knife skills.  The class was taught by Chef Mataio Gillis from Ciao Thyme.  After Chef Gillis inspected, sharpened and honed everyone’s knife, we reviewed types of knives and their function, proper knife care and body mechanics.  My intentions for signing up for the class, were not entirely honorable.  I wanted Dave to be more comfortable with slicing and dicing, so I do not end up doing all the “prep” work when we cook together.  Even though I am pretty efficient with a knife, I definitely learned some new tricks!   We practiced brunoise, fine brunoise, small, medium, and large dice,  julienne, allumette and batonnet cuts on potatoes, carrots and celery.  As for Dave, he is now in charge of all mirepoix prep and knife care!

The Pico De Gallo was the result of 15 students chopping tomatoes, peppers, onions, garlic and cilantro.   As with all classes at The Pantry, we ended with a meal of Pico De Gallo, chips, guacamole and a cold beer!  Since I had a beautiful filet of fresh Alaskan halibut on hand for dinner, I decided to take my portion home and serve it with the fish!   I served an avocado and radish salad with a cumin – lime vinaigrette alongside the halibut.  Just like the class and the beautiful spring day, the meal was fabulous!

halibut 009.2


For the Avocado and Radish Salad with Cumin and Lime Vinaigrette

For the dressing

1/3 cup of fresh squeezed lime juice

2/3 cup very light olive oil

1/2 teaspoon cumin

1/4 – 1/2 teaspoon honey or agave

salt and pepper to taste

For the salad

mixed lettuce of your choice – I used butter lettuce and watercress, torn into bite size pieces

about 1 Tablespoon coarsely chopped cilantro per serving

1/2 large dice avocado per serving

2-3 thinly sliced radishes, per serving

for the garnish – finely diced radish and lime zest

Toss the lettuce and radishes together.  Add the dressing and toss again.  Gently fold in the avocado.  Garnish with the lime zest and diced radish

I don’t have permission to share the Pico De Gallo recipe we made in class.   Just make your favorite!  Also, when grilling a flaky fish like halibut, it is extremely important that your grill is very hot and very well oiled!  It takes just a few minutes on each side for perfectly cooked fish.  


Filed Under: Fish and Seafood, Quick - Week Night Tagged With: avacado, cilantro, halibut, radish, tomato

Black Bean and Corn Salad, BBQ Chicken and Ribs, and Peach Cobbler

08/24/2013 by Laura 1 Comment

Last Sunday, we had a mini family reunion.  My Mom and Dad drove over from Kennewick and my cousin Keith, his wife Monique and son Carl were here from New York.  The New York cousins were on a stop-over in Seattle, prior to their 7 day Alaska cruise!  Like every good family reunion, the food was delicious and plentiful.  Because we were so busy visiting and eating – I don’t have a lot of “finished” product shots.  I did want to share a couple of the recipes anyway.

August 23, 2013 082

The Menu

Dave’s Smoked Baby-Back Ribs

BBQ Chicken (see previous post)

Laura’s Potato Salad (see previous post)

Tomato, Basil and Fresh Mozzarella Salad

Black Bean and Corn Salad with Cilantro and Citrus Vinaigrette

Peach and Blueberry Cobbler with vanilla ice cream

August 23, 2013 105.2

For the Black Bean and Corn Salad with Citrus Vinaigrette

4-5 ears of corn, shucked, cleaned and grilled

1 pound dry black beans*, soaked overnight, cooked with 2 cloves of garlic, rinsed and thoroughly chilled (*yes you could use canned beans)

1 large purple onion, chopped finely

2 jalapeno peppers, minced finely

1/2 cup finely minced fresh cilantro

salt and pepper

For the Citrus Vinaigrette

Juice of 3 limes, about 1/3 cup

1/4 cup orange juice

3/4 cup olive oil

1/2 Teaspoon cumin – or more to taste

1/4 teaspoon chipotle chili powder – or more to taste

1/2 teaspoon salt

Place all in a jar and shake well.  Pour over salad.  Refrigerate overnight before serving.

Helpful hint!  When cutting corn off a husk, place a small bowl upside down inside a bigger bowl.  The kernels will stay in the mixing bow!

August 23, 2013 013.2

For the BBQ ribs

Prepare the ribs a day ahead to allow the rub to soak in.  Use any bbq rub you like.  The most important part is removing the silvery membrane from the back of the ribs, first.  Rub both sides of the rib with your seasoning of choice, place in pan and refrigerate overnight.  Bring the ribs to room temperature prior to smoking.  Dave smokes the rib racks about 4 hours.  We then cover with bbq sauce and keep warm in the oven until ready to serve.

August 23, 2013 044.2

August 23, 2013 066.2

For the Tomato, Basil and Fresh Mozzarella Salad

Slice large, ripe tomatoes.  Slice the same amount of fresh mozzarella.  Arrange on plate by alternating a tomato slice and a cheese slice.  Top with sliced basil.  Sprinkle with fresh, fruity olive oil and season with salt and pepper.

August 23, 2013 177.2

For the Peach Cobbler

I used Palua Deen’s recipe, with the addition of blueberries from the garden. (I omitted the water as the peaches were really juicy.)

4 cups peeled, sliced peaches

2 cups sugar, divided

8 tablespoons butter

1 1/2 cups cake flour

1 1/2 cups milk

1 cup blueberries, for my version

Ground cinnamon, optional

Preheat oven to 350 degrees F.

Combine the peaches, 1 cup sugar, in a saucepan and mix well. Bring to a boil and simmer for 10 minutes. Remove from the heat.  Add in one cup of blueberries, if desired.

Put the butter in a 3-quart baking pan and place in oven to melt.

August 23, 2013 146.2

Mix remaining 1 cup sugar, flour, and milk slowly to prevent clumping. Pour mixture over melted butter. Do not stir. Spoon fruit on top, gently pouring in syrup. Sprinkle top with ground cinnamon, if using. Batter will rise to top during baking. Bake for 30 to 45 minutes.

To serve, scoop onto a plate and serve with or vanilla ice cream.

Filed Under: BBQ, Memorable Events, Pork, Poultry, Salads Tagged With: beans, corn, peaches, ribs

Summer Harvest: Peach and Roasted Beet Salad, Garden Bruschetta and Half Sour Pickles

08/10/2013 by Laura Leave a Comment

This week, I tried to keep pace with everything the garden was throwing at us!  There were pickles to be made, raspberries to be preserved, green beans, beets, peaches that had to be eaten.  What can I say, it’s a tough job and somebody’s got to do it!

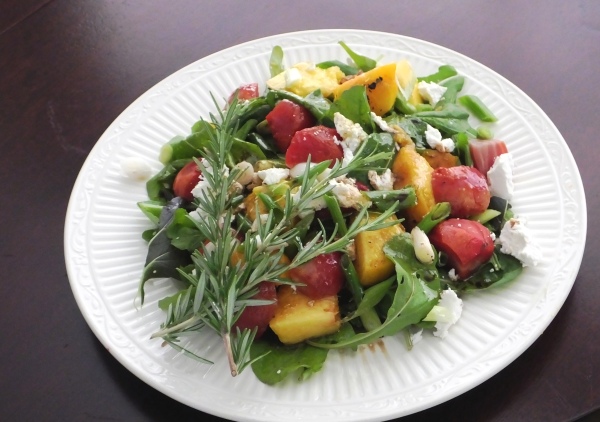
First up is a wonderful, refreshing Peach and Roasted Beet Salad.  Yup – you read that right!

8.10.13 030.1

The recipe is inspired by one I found on our local co-ops website, PCC Natural Markets.

Ingredients

  • 10 to 12 small beets: red, yellow and Chiogga
  • 3 green onions, sliced in 1/4′ slices on the diagonal
  • 2 yellow peaches or nectarines, peeled, seeded, grilled, cooled and sliced into chunks
  • 5 ounces baby arugula
  • 2 ounces crumbled goat cheese

For the Dressing

  • 1/2 cup fresh orange juice
  • 1/4 cup balsamic vinegar
  • 1/4 teaspoon unrefined sea salt
  • Fresh ground black pepper
  • 2 teaspoons fresh thyme
  • 1/2 cup olive oil

Scrub the beets.  Place in a roasting pan, toss them in a generous dash of olive oil.  Roast them at 350′ for about 35 minutes or until you can easily insert a knife tip into the largest one.  Put the beets in a zip lock bag and place them in the refrigerator.  Once cool, the skins will slide right off.

I grilled the peaches for a few minutes to intensify the flavor.  I chilled them before assembling the salad.

Combine the dressing ingredients in a jar.  Shake well, and refrigerate.

To plate the salad:  Arrange the arugula, beets, peaches on a serving plate.  Add the diced onions.  Garnish with the crumbled goat cheese  a sprig of rosemary.  Drizzle with the dressing.

Sautéed Green Beans, Laura’s Way!

Green beans have been a part of summer my entire life.  My grandpa grew them, my mom grew them and I continue to grow them today.  I remember one summer driving with my mom, cross country for one of their West Coast to East Coast moves.   Every dinner, for two weeks, was served with green beans!  I’ll never forget the look on the server’s face at the restaurant in Springfield, MO, when I let out a big “OH NO” after asking her what the vegetable of the day was!   We explained our situation, and we all had a good laugh!

8.10.13 015.1

Sauté a diced, sweet onion in a good amount of olive oil in a large sauté pan, that has a lid.  Add a desired amount of diced bacon (or not) and cook most of the way done.  Add the beans.  I had a combination of wax beans and Royal Burgundy purple beans (they turn green when they cook).  Saute about 5 minutes.  Add about 3/4 cup of DRY VERMOUTH.  Yup – an old restaurant trick. Bring to a slow simmer, cover, and steam about 20 minutes.  Season with salt and pepper and fresh dill.

Garden Fresh Bruschetta

One of our favorite summertime treats is straight from the garden bruschetta. Diced tomatoes, finely chopped garlic and fresh sliced basil, all tossed with the best olive oil and placed on a toasted slice of baguette!  YUMM!  We had some fresh mozzarella on hand, so I added a pinch to each, glorious serving.

8.10.13 062.1

8.10.13 051.1

Half Sour Pickles

I absolutely LOVE the fresh, bright green pickles that are served “all you can eat” style at any good deli!  I had no idea how simple they were to make!  Thanks to a very productive pickling cucumber plant, I now have my own  jar of half sours, bubbling away in my refrigerator.  I found the recipe in The Victory Garden cookbook.

pickles 008.1

Ingredients

12 pickling cucumbers, about 3-4″

4-5 cloves of garlic (original recipe calls for 1)

6-8 sprigs fresh dill

1/2 teaspoon dill seeds

1 tablespoon pickling spices

1/4 cup kosher salt

1/4 cup white vinegar

2 1/2 quarts of water

Thoroughly clean the cucumbers.  Halve or quarter them.  Wash the dill.  Peel and flatten the garlic.  Pack the cucumbers, dill, garlic, dill seed and pickling spice in a large glass jar, a pickle crock or a big glass bowl.  You will want to make sure the pickles will be covered with at least two inches of the water.

Bring the salt and the water to a boil.  Boil a full two minutes.  Pour the brine over the cukes.  Cover the jar with cheesecloth and secure it with a rubber band.  Let the pickles sit on your counter for 2-3 days.  The brine will get cloudy as fermentation occurs.  Once fermented to your taste, add the 1/4 of vinegar, cover and refrigerate.  They will keep forever under refrigeration, but believe me, they won’t last that long!

Raspberry Jam

I am not quite sure what motivated me to purchase a flat of raspberries at the farmers market, with everything else going on!  I do have raspberries in the garden, but only enough to add to my morning yogurt or smoothy each day.  You can see, they were hard to resist.  I love using raspberry jam in my thumbprint cookies at Christmas.  This year, they will be extra special 100% home made!

farmers market and risotto 013

Raspberry Jam*

I used 6 pints of fresh raspberries, about 4 cups of sugar, and the juice of one lemon.  I mashed the berries a bit with a potato masher.  I cooked the berries, sugar and lemon juice to a temperature of 220′, per my candy thermometer.  I processed the jam in 12 1/2 pint jars, for about 20 minutes.  It is absolutely delicious!

jam 015.1

*Note – there are 100’s of fabulous step by step instructions on the internet, for canning jams.  I was in a hurry and did not shoot the entire process, just the final product.  It is fun and easy and I encourage you to give it a try with your favorite fruit or berry!

Filed Under: Gardening, Salads, Vegetables, Vegetarian Tagged With: basil, beets, bruschetta, garlic, green beans, peaches, pickles

Chilled Cucumber Soup and Salad Nicoise with Salmon

07/10/2013 by Laura 1 Comment

Quite a few things came together, all at the right time,  for this meals inspiration.  Lettuce, cucumbers and green beans from the garden, 2 quarts of fresh chicken stock in the fridge,  and really warm weather.  Inspired by the fabulous cucumber soup I had at Les Halles the week before, I decided to give it a whirl.  You will want to start early in the day, as everything needs to be prepped and chilled before serving.

cucumber soup and salad nicoise 203.2

Chilled Cucumber Soup

3 large, fresh cucumbers – peeled, seeded, chopped

1 large leek, cleaned and chopped, white and tender green parts

3 tablespoons of butter

Melt the butter in a saucepan.  Add the chopped cucumber and leeks and sauté over low heat about 20 minutes.  Do not brown, just soften.

cucumber soup and salad nicoise 070 cucumber soup and salad nicoise 073.2

Add two cups of chicken stock, and a little salt.  Simmer very low, about 30 minutes.

Place mixture in blender in two batches, and blend thoroughly.  Pour into bowl and chill until very cold.  (I put the bowl in the freezer to speed up the process.)

cucumber soup and salad nicoise 077.2

Once the soup is cold, place it back in the blender.  Add 1 Tablespoon fresh lemon juice, one additional peeled, seeded, chopped cucumber and 1 cup of heavy cream.  Adjust salt and pepper to taste.  Put back in fridge until ready to serve.   Serve in chilled bowls and garnish with minced dill or mint.

For the Salad Nicoise

These are the basic ingredients.  You will need to adjust the portions for the number of servings you need.

Small baby potatoes

cucumber soup and salad nicoise 003

Simmer potatoes until just done.  Cool immediately in a colander with a little ice.  Place in bowl, add a little of the salad dressing.  Chill thoroughly.

Hard-boiled eggs – quartered and chilled

Tomatoes – quartered and chilled

Green beans – cooked and chilled

Sauté until just done, cool down immediately in ice water, drain, place in bowl and add a little dressing.  Chill well.  (I cook green beans as follows:  heat a little olive oil in a skillet.  Sauté about 5 minutes.  Add 1/2-3/4 cup of dry vermouth, reduce heat, cover and steam until done.  Season with salt and pepper.  I also add dice onion in the first step, if having the beans on their own.)  Your eyes are not deceiving you….those are purple beans.  They turn green when they cook.  My grandpa always grew that variety and I continue to do so today!  We threw in a few wax beans as that is what was ready to pick.

cucumber soup and salad nicoise 005 cucumber soup and salad nicoise 052

Nicoise olives

Red onion, sliced into 1/4 round slices

Cold, grilled or poached salmon (or, traditionally, canned tuna packed in oil)

We always grill the salmon on foil coated with a little olive oil.  Dave is really picky about the pin bones.  I use a pair of very sharp tweezers to remove them.

 cucumber soup and salad nicoise 022.2cucumber soup and salad nicoise 018.2

Capers for garnish (optional)

Anchovies for garnish (optional)

For the dressing

1 cup fresh, fruity olive oil

1/3 cup red wine vinegar

1/4 cup lemon juice

1 clove finely minced garlic

1 Teaspoon dijon mustard

Salt and pepper

Whisk all together in measuring cup or glass jar.

Assembling the Salad

Bring all your ingredients together.  Make sure your bowl and plates are cold.  Start with a base of lettuce.  We are using romaine from the garden.  Place all ingredients in sections around serving bowl.  You can also plate individually, using the same approach.  When finished, drizzle with a little dressing, garish with capers and anchovies if desired.

cucumber soup and salad nicoise 151.2  cucumber soup and salad nicoise 162.2

cucumber soup and salad nicoise 208.2

Filed Under: French, Quick - Week Night, Salads, Soup Tagged With: salmon

Let the grilling season begin!

06/10/2015 by Laura Leave a Comment

Summer has arrived ahead of schedule in Seattle.  We are experiencing record breaking temperatures in the low 80’s.  Our garden is loving every minute of it, and I am certain I will have ripe tomatoes very soon.

As you know, we grill all year ’round for pleasure, but when it is as hot as it is, it is out of necessity.

One of our summertime favorites is Dave’s bbq chicken.  As I’ve mentioned in previous posts, low heat and frequent turns result in  moist, juicy and tender  chicken.  We love the whole chicken legs as they cook evenly and have lots of flavor.  Our favorite side dish is our traditional potato salad.  Did you know nasturtiums flowers and leaves  make lovely garnishes and they are edible! Stay cool and enjoy!

BBQ Chicken and Potato Salad Directions

BBQ Chicken and Potato Salad

Have a wonderful evening,

Laura


Filed Under: BBQ, Dave's Diner, Fabulous 50's Flashback, Poultry Tagged With: bbq, chicken, grilling, potato, salad

Chicken Enchiladas Verde and the Fentons 50th Performance Celebration

07/23/2014 by Laura 1 Comment

Two of my favorite Mexican dishes are enchiladas verde or the saucier version, enchiladas suiza.   Inspired by my nephews favorite green sauce from a taco wagon in Kennewick,  I decided to create a version of green sauce as close to their favorite as possible.  With tomatillos, jalapenos and Anaheim chilis ripe in the garden, it was time to attempt the infamous green sauce!  Of course, final confirmation on how close to their favorite this is, will need to come from them!

green enchiladas 058.2

Laura’s Green Sauce

8-10 fresh, firm tomatillos, husk and stems removed, and rinsed (it will not taste the same if using canned tomatillos)

2 jalapeno peppers

3-4 Anaheim chilies or poblano peppers

5-6 cloves of garlic

one sweet onion, like Walla Walla

olive oil, to coat the pan

salt for seasoning

white balsamic vinegar – about 2 tablespoons (I received a sample of O Brand, and I love it!)

6-8 sprigs of fresh cilantro

Place all the tomatillos, jalapeno, Anaheim chili or poblano pepper, garlic and onion in an oiled roasting pan.  Season with salt. Roast in a 350′ oven about 25 minutes.  Let the chilies cool and remove the tough, outer skin, seeds and membranes.  Slice the jalapenos in half and remove the seeds and membrane.

13.22

Place all the roasted vegetables in the blender and blend until smooth.  Add the cilantro and two tablespoons of white balsamic vinegar.  Add additional salt if needed, and blend again.  To make it hotter, add additional roasted jalapenos.  If you need to cool it down, add additional roasted tomatillos.  If you prefer a smoother sauce, you can force it through a sieve or colander.  I used the sauce as it was for the enchiladas.

green enchiladas 021

to prepare the Chicken Enchiladas

Meat from one whole cooked chicken, bones and skin removed – you can use a rotisserie chicken or a fresh, poached chicken

1 chopped sweet onion, like Walla Walla

2 cups shredded cheese, like Monterey Jack

1 – 1 1/2 cups of THE Green Sauce

1 cup of sour cream

12-16 tortillas, we used flour – if using corn, soften them in a little oil in a warm skillet before assembling the enchiladas

Place the chicken, onion, cheese, green sauce and sour cream in a bowl.  Mix the ingredients together.

green enchiladas 037

Place 3-4 tablespoons of the mixture on the tortilla a roll up tightly.

green enchiladas 039

Place enchiladas in an oiled baking dish, seam side down.  Continue in this manner until the filling is used up.  Pour additional sauce over the enchiladas.  Add additional grated cheese.  Bake covered for 25 minutes at 350′, remove cover and bake an additional 10 minutes.

green enchiladas 048

Serve with a little sour cream and a garnish of cilantro.

I was hoping this weeks post would solely be about our fabulous garden party and barbeque in honor of the Fenton’s 50th performance last Sunday!  We worked all last week prettying up the yard, scrubbing the patio furniture and freshening up the garden.  We made potato salad, black bean and corn salad, watermelon and blueberry salad. Hamburgers and hot dogs were readied to grill.  The Fentons performed from 2-3pm at The Bite of Seattle.  About 4pm, as I  finished putting the flowers on the tables outside, and after 20 hot and dry days, the skies opened up and the rain came pouring down!   Needless to say – the party moved inside and the camera was put away! I did want to share the cupcakes I made with you.  The edible logo stickers are from Edible Tasty Prints.  I used the design from the bands newest t-shirt, unbeknownst to Dave!  Aren’t they adorable?

By the way, Monday was absolutely perfect for an outdoor party!

cupcakes cupcake

fentons

Be sure and visit the Fentons website and order yourself a copy of their new CD “Little Window“.   My favorite new song is “Stir the Love” written by my sweetheart, Dave Keller.

LW_Cover_final_jpeg


Filed Under: Memorable Events, Mexican Tagged With: chicken, chili, green, mexican

Laura’s Famous Fried Chicken and Country Gravy

11/21/2013 by Laura Leave a Comment

I was very lucky to grow up in a big family of farm-house cooks.  My maternal Grandpa had 9 brothers and sisters.  They were all born and raised in and around Washington wheat country, in Whitman County.  Many of them had farms, leased farms, worked on farms; wheat, cattle, hogs, chickens.  My Grandma and my Mom, and all the other women folk in the county, spent hundreds of hours making enormous Sunday style suppers; everyday, during wheat harvest.  No dishwasher, limited refrigeration, and a wood fired stove…can you even imagine?

By the time the 9 brothers and sisters married and had kids, and their kids had kids; we totaled over 100.  About half of the original 9 brothers and  sisters and their spouses, moved off the farms.  They did not, however, give up “farm style” cooking.   Fresh cream, fresh butter, vegetable, chickens, pork and beef were bought from their previous neighbors or raised on their own farm!  These great cooks and farm raised food led to some pretty spectacular grub, at our family reunions!    Cakes, pies, salads (long before we worried about potato salad sitting out too long), home-made bread, rolls,  cookies and FRIED CHICKEN!  I remember the chicken, and I am lucky enough to have watched my Grandma and Mom make it 100’s of times.  My recipe is my own, and I don’t shake it in a brown paper bag, mostly because I don’t have any!  While this was a frequent Sunday supper as a kid, it is now a one or two time a year treat!

 rolls, pork chops and fried chicken 304.4

For the Fried Chicken

1 fresh chicken, preferably organic, cut into 8 pieces (cut each breast half in 2 pieces)

1 quart of buttermilk

3 Tablespoons of Mrs. Dash

1 Teaspoon Garlic Pepper

1 Teaspoon Kosher Salt

1 Teaspoon Poultry Seasoning

1 dash Paprika

Place the chicken pieces in a large glass bowl.  Add enough buttermilk to cover all the chicken.  (You may not need the whole quart.)  Add the seasonings.  Toss the chicken to distribute evenly.  Cover with plastic wrap, and marinate overnight.

rolls, pork chops and fried chicken 019.4

Remove the chicken from the buttermilk.  Place in a colander in the sink and let the extra buttermilk drip off.  Meanwhile, add a cup of flour, 1 teaspoon of salt and 1 teaspoon of pepper to a sturdy plastic bag. (You made need to add flour, salt and pepper a couple more times.)

rolls, pork chops and fried chicken 210.2

Pour about 2 inches of peanut oil into a large heavy pan – like a Dutch oven.   Heat over medium high heat.  Place chicken in bag of flour, 2 pieces at a time,  and shake to coat evenly.  Place chicken in hot oil and fry on all sides until evenly brown.    Remove chicken from oil and place on a baking pan with a rack.  Repeat until all chicken has been fried. (DO NOT discard the flour, you will need it for the gravy.)  If you intend to serve with mashed potatoes, you may want to start those now.

rolls, pork chops and fried chicken 237


rolls, pork chops and fried chicken 241.2

Place the chicken in a 325′ oven for about 20 minutes, or until a thermometer reads a minimum of 165′, in the thickest piece.  Start the gravy!

For the Country Gravy

flour from coating chicken

fat from frying chicken

8 ounces chicken stock

1 quart of milk

salt and pepper

Drain all but about 1/4 cup of oil from the pan the chicken has been frying in. (Make sure you retain all the little brown bits!) Heat the oil in the pan over medium heat.

Sprinkle in about 1/2 cup of the seasoned flour you were dredging the chicken in.

rolls, pork chops and fried chicken 255.2

Stir with a whisk until flour and oil are incorporated, and a roux is formed.  Once the roux is slightly browned, add in the chicken stock.  The mixture will be very thick.  Lower the heat and continue to mix thoroughly.

rolls, pork chops and fried chicken 280.2

When the stock is fully incorporated, turn heat to low and whisk in about 75% of the milk.  Continue to stir.  Taste for seasoning.  Add additional stock or milk if gravy is too thick.  Keep warm until ready to serve.

rolls, pork chops and fried chicken 293.2

When ready to plate, place chicken, your favorite mashed potatoes, and vegetable on plate.  Spoon gravy over potatoes.  Garnish with fresh, chopped parsley.  Savor every bite…and do not tell your cardiologist about this meal!

rolls, pork chops and fried chicken 294.2

Filed Under: Memorable Events, Poultry Tagged With: country gravy, fried chicken

  • 1
  • 2
  • 3
  • Next Page »

Looking for a particular recipe? Search here!

Stay in touch!

Enter your email address to subscribe to More Savory Less Sweet, and receive notifications of new posts by email.

What we’re doing when we’re not blogging!

Today’s project....homemade pinto beans. I start Today’s project....homemade pinto beans. I start with blackened onions, garlic and cumin.  Add soaked beans, cilantro, jalapeño, a beer and chicken or vegetable stock.  Simmer all day! #slowfood #itsbetterathome #stockthefreezer
Nine hours later! Amazing batch. #bolognese Nine hours later! Amazing batch. #bolognese
I’m going to be here awhile! #mirepoix #brunoise I’m going to be here awhile!
#mirepoix #brunoise #slowfood #itsbetterathome
Instagram post 17878558262052654 Instagram post 17878558262052654
Birthday dinners continue. Night 2... Chicken, shr Birthday dinners continue. Night 2... Chicken, shrimp and andouille gumbo. Happy birthday Dave!
#gumbo #slowcookedfood #itsbetterathome
Chicken tacos, rice and beans! #scratchcooking #be Chicken tacos, rice and beans!
#scratchcooking #betterathomr
I’m not cooking another thing this year! Happy N I’m not cooking another thing this year! Happy New Year! Dave Keller’s favorite chicken parmigiana! Cheers.
French onion soup! Used every last bit of the Chri French onion soup! Used every last bit of the Christmas roast! Julia, Jacques and Ina mash up! Sprung for the good cheese. Bon Apetite!
#frenchonionsoup #slowfood #nothingwastedpodcast
My Christmas sweater is now my New Years Eve sweat My Christmas sweater is now my New Years Eve sweater! 420 stitches, fingering weight yarn, size 2 needles and hundreds of floats to catch for the next 15 rows! #whodoesntloveachallenge #tukuwool #knittersofinstagram
Load More... Follow on Instagram
Foodista Food Blog of the Day Badge

Copyright © 2021 · Lifestyle Pro Child Theme for More Savory, Less Sweet on Genesis Framework · WordPress · Log in