• About the Author
  • Recipe Index
  • Contact Me
  • The Kitchen Crew
  • The Legal Necessities

More Savory, Less Sweet

Adventures in Food - Taste, Explore, Inspire and Share

Salmon Nicoise and Heirloom Tomato Bruschetta

08/09/2014 by Laura Leave a Comment

I knew I was kind of pushing my luck serving salmon two days in a row.  Dave informed me that it is not much of a “hard-working man’s meal”.   By hard-working, he means painting the second of four sides of the house.  I think he was too hot and tired to protest.  I did surprise him by making a beautiful plate of our favorite heirloom tomato bruschetta.  We finally have tomatoes and basil all ripe together. If you are not growing your own tomatoes, you must splurge; at least once this summer, on a few from the farmers market and make this dish.  A little fresh mozzarella and prosciutto make this a meal on its own!

bruschetta and niciose 026

Though Salad Nicoise is traditionally made with tuna, I often see it made with salmon as I have done here.  Maybe it is a Pacific Northwest thing.  Regardless, it is becoming my favorite preparation!  And since it’s summer and we are having a French salad, I had to serve it with a lovely, dry rose!  Someone needs to inform the folks who stock the wine in the cooler that people drink chilled rose in the summer.  There were numerous choices on the shelf, and none in the cooler!  Doesn’t it look beautiful with the salmon?

bruschetta and niciose 030.2

for the Salad Nicoise

for the dressing

Dijon Vinaigrette – not traditional – but my version!

2/3 cup of great quality olive oil

1/4 cup sherry wine vinegar

1 teaspoon Dijon mustard

1/2 teaspoon tarragon

Fresh cracked pepper and salt to taste.

Whisk all together in a small bowl or measuring cup.

for the salad

4-6 small baby new potatoes, boiled gently until fork tender, drained and cooled

1/2 pound haricot vert – or any other small green bean, blanched until tender and cooled

2-4 hard-boiled eggs

a handful of heirloom cherry tomatoes

mixed baby lettuce

Nicoise olives (I could not find these at my regular store.  I substituted the Lucques olives I had on hand.  At least they were French!)

4 ounce portion of grilled salmon or one can of good quality tuna packed in olive oil, per serving

capers for garnish

fresh ground pepper and salt

Slice the cooled potatoes, place in a small bowl and pour a little of the dressing over them. Garnish with a small spoonful of capers.   Stir gently to coat.  Place the green beans in a small bowl and dress them in the same fashion.  Slice the tomatoes, peel the eggs and chill until ready to plate.

bruschetta and niciose 018.2

To assemble the salad, place a handful of the baby lettuce on a chilled dinner plate.  Sprinkle with a little of the salad dressing.  Arrange the sliced potatoes, green beans, eggs, tomatoes, salmon or tuna, and olives in a pleasing pattern.  Spoon a little more dressing over the salad.  Bon appetite!

to prepare the Bruschetta

fresh baguette bread, sliced on the diagonal

olive oil

salt and pepper

chopped heirloom tomatoes, about 1 cup

finely minced garlic, 4-5 cloves

1/4 cup basil chiffonade

Brush the sliced baguette bread with olive oil.  Season with salt and pepper.  Toast until the edges brown.

Mix the diced tomatoes, minced garlic and basil together in a small bowl.  Add a little olive oil to coat the tomatoes.  Stir gently.

Spoon the tomato basil mixture onto the toasted bread.  Garnish with a little more basil.

bruschetta and niciose 010.2


Filed Under: Appetizers, Fish and Seafood, Quick - Week Night, Salads Tagged With: basil, bruschetta, french, heirloom, nicoise, rose, salad, salmon, tomato

Grilled Halibut with Pico De Gallo and Avocado Salad

04/14/2014 by Laura 1 Comment

Dave and I spent a few hours at the Pantry at Delancey on Sunday afternoon, “sharpening” our knife skills.  The class was taught by Chef Mataio Gillis from Ciao Thyme.  After Chef Gillis inspected, sharpened and honed everyone’s knife, we reviewed types of knives and their function, proper knife care and body mechanics.  My intentions for signing up for the class, were not entirely honorable.  I wanted Dave to be more comfortable with slicing and dicing, so I do not end up doing all the “prep” work when we cook together.  Even though I am pretty efficient with a knife, I definitely learned some new tricks!   We practiced brunoise, fine brunoise, small, medium, and large dice,  julienne, allumette and batonnet cuts on potatoes, carrots and celery.  As for Dave, he is now in charge of all mirepoix prep and knife care!

The Pico De Gallo was the result of 15 students chopping tomatoes, peppers, onions, garlic and cilantro.   As with all classes at The Pantry, we ended with a meal of Pico De Gallo, chips, guacamole and a cold beer!  Since I had a beautiful filet of fresh Alaskan halibut on hand for dinner, I decided to take my portion home and serve it with the fish!   I served an avocado and radish salad with a cumin – lime vinaigrette alongside the halibut.  Just like the class and the beautiful spring day, the meal was fabulous!

halibut 009.2


For the Avocado and Radish Salad with Cumin and Lime Vinaigrette

For the dressing

1/3 cup of fresh squeezed lime juice

2/3 cup very light olive oil

1/2 teaspoon cumin

1/4 – 1/2 teaspoon honey or agave

salt and pepper to taste

For the salad

mixed lettuce of your choice – I used butter lettuce and watercress, torn into bite size pieces

about 1 Tablespoon coarsely chopped cilantro per serving

1/2 large dice avocado per serving

2-3 thinly sliced radishes, per serving

for the garnish – finely diced radish and lime zest

Toss the lettuce and radishes together.  Add the dressing and toss again.  Gently fold in the avocado.  Garnish with the lime zest and diced radish

I don’t have permission to share the Pico De Gallo recipe we made in class.   Just make your favorite!  Also, when grilling a flaky fish like halibut, it is extremely important that your grill is very hot and very well oiled!  It takes just a few minutes on each side for perfectly cooked fish.  


Filed Under: Fish and Seafood, Quick - Week Night Tagged With: avacado, cilantro, halibut, radish, tomato

Savory Tomato Tart with Pesto, Mascarpone and Ricotta Filling – and Detailed Pie Crust Instructions

09/04/2013 by Laura 1 Comment

The tomato “situation” continues at our house.  Don’t think I am not grateful for the bounty of fruit this summer!  It is just sad that the season is so short and it happens all at once!  After making 8 quarts of sauce this weekend, I still have about 30 pounds of tomatoes, in varying stages of ripeness.

I searched the internet for a Tomato Tart recipe that would incorporate all the things in my refrigerator that I needed to use up.  Pesto, Mascarpone, Ricotta, Parmesan…. I found variations, but not exactly what I wanted.  Below is the combination I came up with.  It was quite yummy!

tart 139.2

Laura’s Tomato Tart

Prepare the crust

Pie crust preparation has been revolutionized by the food processor!  I only started making crust about 3 years ago.  Up to that point, I used the frozen or refrigerated options.  There were a couple of good reasons:  First, I really did not have a proper counter to roll out dough, until the kitchen remodel in 2010!  Second, I think I inherited “fear of dough” from my Mom.  I will never forget walking in the door from school at about age 10, just in time to hear my Mom let out a word I had not heard her use before, while watching the dough, bowl and rolling-pin go into the garbage can!  I don’t remember what happened after that…. I don’t think there was a pie!  Anyway, if you have a food processor, make the crust from scratch.  It is worth the effort and you know exactly what is in it!  Detailed instructions below.  This is a very easy dough to work with.

(The Crust Recipe is Ina Garten’s, from Barefoot in Paris, 2004)

1 1/2 cups regular flour, plus more for dusting the board

1/2 teaspoon Kosher salt

12 tablespoons cold unsalted butter, divided

3 to 4 tablespoons ice water

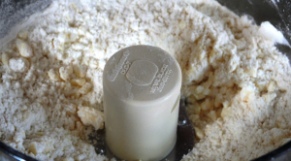
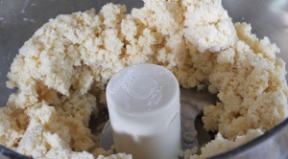
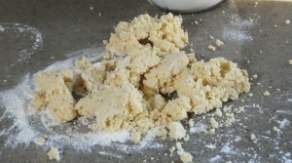
Have all your ingredients ready to go. (pic 1) Put the flour and 1/2 teaspoon salt in the bowl of a food processor fitted with the steel blade. Cut 12 tablespoons (1 1/2 sticks) of the butter into large dice, add to the bowl, and (pic 2) pulse until the butter is the size of peas.  With the machine running, add the ice water a tablespoon at a time, and process until the dough becomes crumbly (pic 3). Don’t over process. (pic 4)Dump the dough out on a floured board, (pic 5) gather it loosely into a ball, wrap in plastic wrap and refrigerate for 30 minutes.

tart 002.1

tart 003.1tart 004.1

tart 007.1tart 008.1

Roll the chilled dough on a well-floured surface to desired thickness, and fit it into tart pan. Roll the pin over the top to cut off the excess dough.

(Thanks for the video and music, Dave!)

???????????????????????????????

tart 015

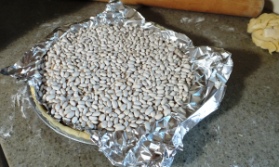
Cut a square of foil to fit into the pan.  Spray with olive oil spray on one side and place, oil side down, into the tart pan.  Fill the foil with beans or pie weights.

tart 038.1 tart 046.1

Bake for 20 minutes. Remove the beans and foil from the tart shell, prick the bottom all over with a fork, and bake for another 10 minutes.

tart 065.1

Prepare the filling

Place all ingredients in a bowl and mix well.  Chill in refrigerator until ready to use.

8 oz. Mascarpone cheese

8 oz. Ricotta cheese

1 cup grated Parmesan

2 eggs

3 Tablespoons Pesto

Salt and Pepper

tart 010

Prepare the tomatoes

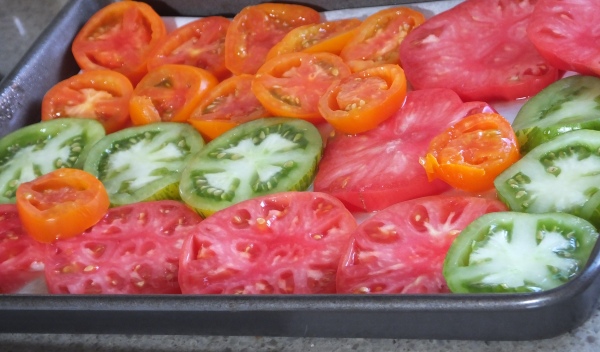
Line a baking pan with parchment paper and spray lightly with olive oil spray.  Slice the tomatoes into fairly thick slices and place on the paper.  Season with salt and pepper and roast at 350′ about 15 minutes.  Set aside until ready to top the tart. (Pre-roasting ensures the tart will not get too watery.) Tomato varieties below are Brandywine, Green Zebra and Juane Flamme.

tart 012.1

Assemble the Tart

Pour the prepared cheese mixture into the pre-baked tart shell.  Bake 75% of the way done – about 40 minutes at 350′.  Place the roasted tomatoes on top and return the tart to the oven for another 10 – 15 minutes, until firm.  Serve the tart at room temperature, with a little fresh basil sprinkled on top.

tart 134

Filed Under: Appetizers, Baking, Quick - Week Night, Vegetarian Tagged With: mascarpone cheese, pesto, pie crust, ricotta, tomato

Ravioli with Creamy Pesto, Roasted Cherry Tomatoes, Basil, and Pine Nuts

08/01/2013 by Laura Leave a Comment

I absolutely adore summer when my garden, or the farmers market, dictate what is for supper.   Last week we purchased beautiful, locally made ravioli from La Pasta.  It has been in the back of my mind since we brought it home and popped it in the freezer.  Also in the back of my mind was a jar of “The World’s Greatest Pesto” (per the signage) that I brought back from Eataly a few weeks earlier.  While I have everything on hand to make pesto, it was one of those days I wanted something quick.  All this coupled with the bumper crop of ripe cherry tomatoes, I knew what we would make for dinner!

Raviolli 062.1

Ingredients

4-6 Ounces Pesto, homemade, store bought, your favorite one

6 ounces fresh cream

1 pound fresh ravioli (ours was a 4 cheese blend)

12 -15 oven roasted cherry tomatoes

1/2 cup toasted pine nuts

1/2 cup slivered basil, plus a little more for garnish

1/2 cup freshly grated parmesan cheese, plus a little more for garnish

Raviolli 006.1

Directions

Roast the cherry tomatoes in a 375′ oven in a small pan coated with olive oil, for about 15 minutes.  Season with salt and pepper before placing in oven.  Remove from oven and set aside.

Toast the pine nuts over low heat in a small frying pan.  Watch carefully as they easily burn.  Remove from heat and set aside.

Grate the parmesan cheese, set aside.

Slice the basil, set aside.

Fill a pasta pot with water.  Add salt, bring to boil.  Meanwhile – prepare the sauce.

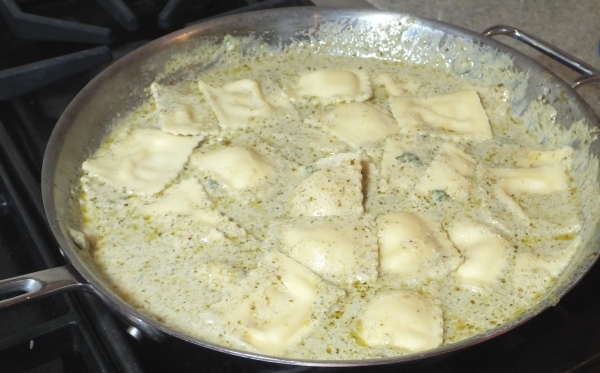
Warm a large sauté pan over low heat.  Add a touch of olive oil.  Add in the pesto and warm.

Raviolli 010.1

Add the parmesan, the basil and the cream.  Stir gently to melt the cheese and warm the sauce.

Raviolli 025.1

Prepare the ravioli according to directions. (Fresh ravioli usually cook perfectly in about 8 minutes.) Drain the ravioli.  Add to the sauté pan.

Raviolli 041.1

Add the toasted pine nuts, slivered basil and roasted tomatoes.  Garnish with parmesan cheese.  Serve with a cold, crisp salad, crusty Italian bread and a light Pinot Grigio.

Raviolli 052.1

Enjoy!

Filed Under: One Pot Meal, Pasta, Quick - Week Night, Vegetarian Tagged With: basil, pesto, pine nut, raviolli, tomato

Tomatoes, Basil, Zucchini – Laura’s Summer Risotto

07/25/2013 by Laura Leave a Comment

Tonight’s dinner was inspired by a posting by Andrew Scrivani who taught the Food Photography class I took last weekend, at CreativeLIVE.com.  The beautiful Tomato and Basil Risotto was created by Martha Rose Shulman, and featured in the NY Times.   Andrew shot and styled the photo that was published with the recipe.

While I have a couple ripe tomatoes in the garden, I did not have enough for this recipe.  A quick trip to the Farmer’s Market (there is one everyday in the summer, somewhere in Seattle) and we were ready to go.   I knew Dave would not be happy with the original vegetarian version of this recipe, so I decided to add in Chicken Italian Sausage and Speck (smoked Prosciutto).  Oh, I also added some diced zucchini….I am adding diced zucchini to everything right now!

farmers market and risotto 022

Laura’s Summer Risotto

farmers market and risotto 168.2

Ingredients

extra virgin olive oil, for sautéing

2 quarts of chicken stock

1 pound Italian chicken sausage, removed from casings

5 slices of Speck or Prosciutto, cut into strips

1 small zucchini, diced

1  onion, diced

2 garlic cloves, minced

3 large diced tomatoes

1 teaspoon fresh thyme leaves

1 1/2 cups Arborio rice

Salt and freshly ground pepper to taste

1 cup dry white

1 additional diced large tomato (I used up my small red and yellow cherry tomatoes)

1/2 cup julienned fresh basil

1/2 cup freshly grated Parmesan cheese – reserve a little for garnish

Put the broth into a saucepan and bring it to a simmer over low heat.

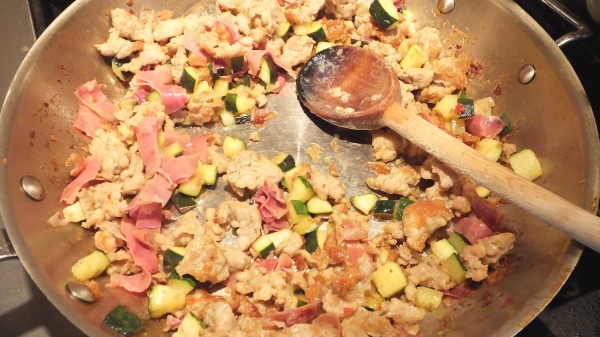
Brown the sausage in a little olive oil in a sauté pan.  Add the diced zucchini and the Speck.  Sauté about 5 minutes.  Add a good splash of wine (about 1/3 cup), steam for a minute.  Turn off the heat and set aside.

farmers market and risotto 125.1

Heat the olive oil over medium heat in a heavy saucepan. Sauté the onion about 5 minutes.  Add the rice and continue to sauté about 5 more minutes.  The rice will snap and pop.

farmers market and risotto 086.1

Add the 3 diced tomatoes, thyme, garlic and salt and pepper.  Sauté until the tomatoes have broken down a bit, bout 5 minutes.

farmers market and risotto 115

Add the remaining wine and stir until it has evaporated and been absorbed by the rice. Begin adding the simmering stock, a couple of ladleful’s (about 1 cup) at a time. The stock should just cover the rice, and should be bubbling, not too slowly but not too quickly. Cook, stirring often, until it is just about absorbed. Add another ladleful or two of the stock and continue to cook in this fashion, adding more stock and stirring when the rice is almost dry. You do not have to stir constantly, but stir often and when you do, stir vigorously. When the rice is just tender all the way through but still chewy (al dente), in 20 to 25 minutes, it is done.

farmers market and risotto 138.1

Stir in the reserved sausage mixture.

farmers market and risotto 144.1

Add one more ladle of stock to the rice. Stir in the additional diced tomatoes, basil and Parmesan and remove from the heat. The mixture should be creamy (add more stock if it isn’t). Serve right away with a garnish of Parmesan and basil.

farmers market and risotto 158

farmers market and risotto 168.1

Filed Under: One Pot Meal, Quick - Week Night Tagged With: basil, chicken, sausage, tomato, zuchinni

Further Confirmation of Spring’s Arrival….Fresh Halibut

04/02/2013 by Laura Leave a Comment

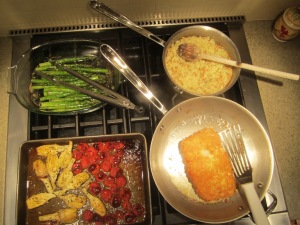
Another sure sign of Spring landed in my grocery basket on Saturday!  First of the season, fresh Alaskan halibut.  While a bit on the pricey side, it’s, for me, a worth while indulgence.  Left to my own devices, I would probably eat fresh Alaskan Halibut and Washington asparagus 3-5 times a week, for the entire season.  While I love it just grilled with a little salt and pepper, my husband enjoys the preparation below.

???????????????????????????????

Parmesan Crusted Halibut with Roasted Tomato and Artichoke Ragu – for 2 servings

Inspired by “Ray’s Boathouse, Seafood Secrets of the Pacific Northwest” Cookbook

Recipes by Charles Ramseyer and staff

for the Tomato and Artichoke Ragu

15-18 cherry tomatoes

Kosher salt

Fresh ground pepper

2 Tablespoons olive oil

1/2 Tablespoon minced garlic

8 artichoke quarters with stems, jarred or frozen

1/4 cup dry white wine

1/4  julienned fresh basil

2 tablespoons butter

Pre-heat the oven to 400′.  Place the artichoke hearts, tomatoes, and minced garlic in a baking pan.  Drizzle with olive oil and lemon juice and season with salt and pepper.  Place the pan in the oven about 10 minutes ahead of the halibut fillets.  Remove from oven when tomatoes are slightly charred and “melted”.  Deglaze the pan with the white wine.  Stir in the butter and garnish with the basil.   Keep warm until ready to serve.

4.1.13 005

for the Halibut

1/4 cup of flour

1 egg

1 tablespoon water

1 cup panko breadcrumbs

1/2 cup shredded parmesan

Zest of 1 lemon, chopped

1 12-14 oz. halibut fillet, skinless

2-3 Tablespoons Olive Oil

Set up three bowls.  Place flour in the first bowl.  Mix the egg and water together in the second bowl.  Mix the panko and parmesan together in the third bowl.

???????????????????????????????

First, dredge the flesh side of the halibut in the flour, shaking off the excess.  Next, dip the floured side in the egg.  Third, dredge the egg side into the panko mixture to coat.  Pat gently to press the mixture into the egg.

???????????????????????????????

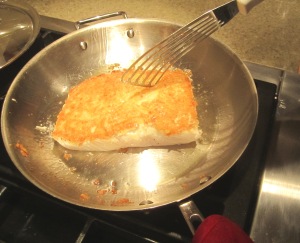
Heat the olive oil in an ovenproof skillet over medium heat.  Place the fillet crust side down and sear until a golden-brown crust forms.  Turn the fillet over and place in oven for 3-5 minutes, or until the centers are pearly white and opaque, depending on the thickness of the fish.

???????????????????????????????

Plate the fish with the ragu alongside or underneath.  We served the meal with my other favorite sign of spring, oven roasted asparagus and a rice pilaf.

4.1.13 087

Filed Under: Fish and Seafood Tagged With: artichoke, halibut, parmesan, tomato

Stay in touch!

Enter your email address to subscribe to More Savory Less Sweet, and receive notifications of new posts by email.
Look here for specific recipes.

Copyright © 2025 · Lifestyle Pro Child Theme for More Savory, Less Sweet on Genesis Framework · WordPress · Log in